
There comes a time in almost every woodworking project where a nail hole or joint needs to be filled, and what better way is there than with making your own wood filler with sawdust.
Okay, well there is other ways. You could reach for a tube or container of wood filler, but it often doesn’t match the wood and the fix sticks out. Maybe you have an extensive color range of fillers? Yes that is possible, but for most of us, this isn’t the case.
Your first thought is probably where to get the sawdust for making your own wood filler? The answer is simple, From the wood itself!
Materials
- Sawdust (well not actually). What you are actually looking for is wood dust. Sawdust contains larger particles that are often different sizes and too large to use in this case. I find the best place to collect wood dust is from my Bosch orbit sander. Not only is the wood dust extremely fine, it is almost always from the wood I am working with. You probably sanded each your wood pieces during your project.
- Binding agent (Wood glue). Most wood glues have a slight yellowy/brown tint to them and they will work just fine. However, if you can find white wood glue, you are going to get the best possible color match.
- Putty knife. I like to use a putty knife somewhere around the 1-3″ range depending on the size of the project. No need to go expensive- any putty knife will do.
- Latex or nitrile gloves. Some glues can contain additives that aren’t great for our skin. Or if you just want to keep your hands clean, grab a pair of tight fitting gloves. Personally, I like getting my hands dirty!
- Mixing surface. Grab a scrap piece of wood to use as a surface to mix your wood filler with sawdust.
Steps: make your own wood filler with sawdust (wood dust)
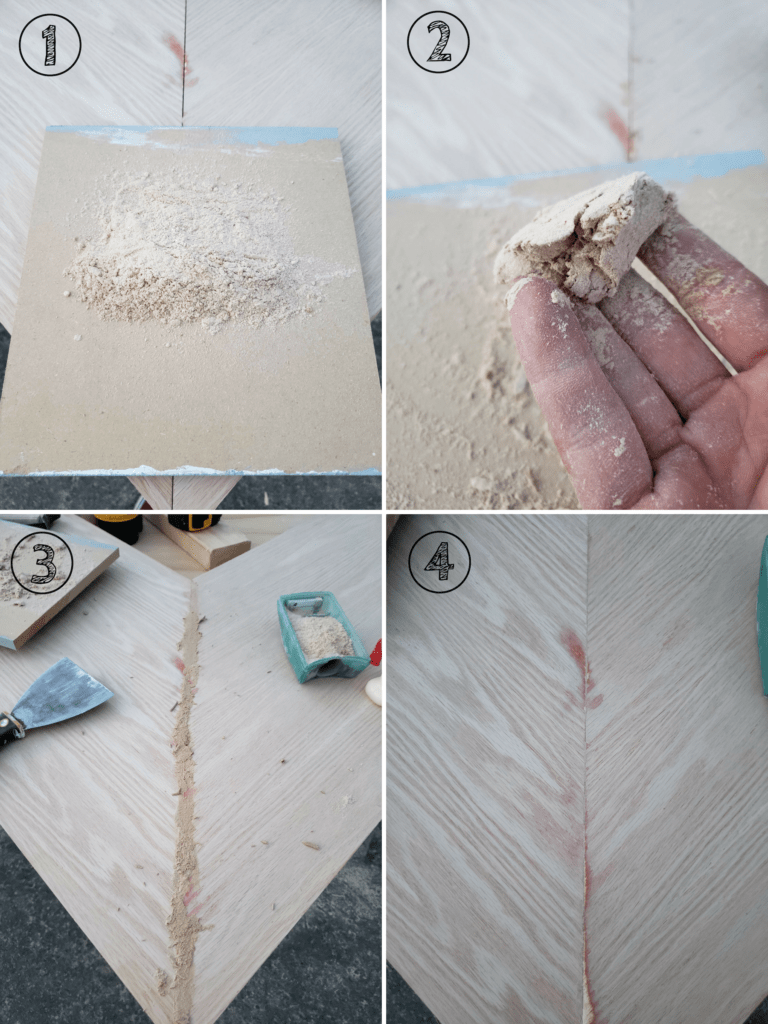
- Gather your wood dust. It will take some practice to determine how much your require, but a good starting point is usually around a palm sized amount.
- Add the wood glue to the wood dust while mixing with your fingers or putty knife. The glue should slowly soften the entire mixture. Don’t add too much glue. Remember, you can always add more as your go.
- Continue to work the ‘dough’ until it behaves like a paste between your fingers. Now it is ready to use.
- Work your wood filler into the cracks you want to fill. I find it easier to do this with my fingers. Work as quickly as possible.
- Scrape off as much excess as you can. This is where I find the putty knife to be invaluable.
- Clean your hands (if not using gloves) and tools. Wood glue dries extremely hard.
- Lightly sand your project. It does not take much sanding to remove any extra filler so use a fine grit sandpaper.
- Discard extra wood filler as it will not keep.
Limitations
As with anything, there are always limitations. Making your own wood filler with sawdust is no exception.
This type of wood filler is not strong enough to join large gaps and cracks.
The colour will be close, but not always 100% accurate. Though I have to say I find it closer than commercial wood fillers. If you plan to stain your project afterword, homemade wood filler typically takes up the stain very similarly to the actual wood.
You can’t match wood grain. Again, this is a limitation of all wood fillers.
A few final tips
SAVE YOUR WOOD DUST. This might sound ridiculous, but save your wood dust! Put it in a plastic container or bag and start making a collection. I have relied upon my collection numerous times to complete a project.
Finally, if you are staining you have a little more room for oversanding (Look at step 4) after you fill in the crack. The stain will cover this up!
Looking forward to trying this on red cedar live edge project.
I use a plastic pastry bag with a very small hole at the tip to avoid getting the sawdust glue from spreading over an area larger than the seam