
Too many people consider IKEA to be cheap furniture built for the college kid. While in some cases this may be true, there comes a time at almost any stage of life where we purchase/acquire something from IKEA. In my case- it was the IKEA kallax shelving unit.
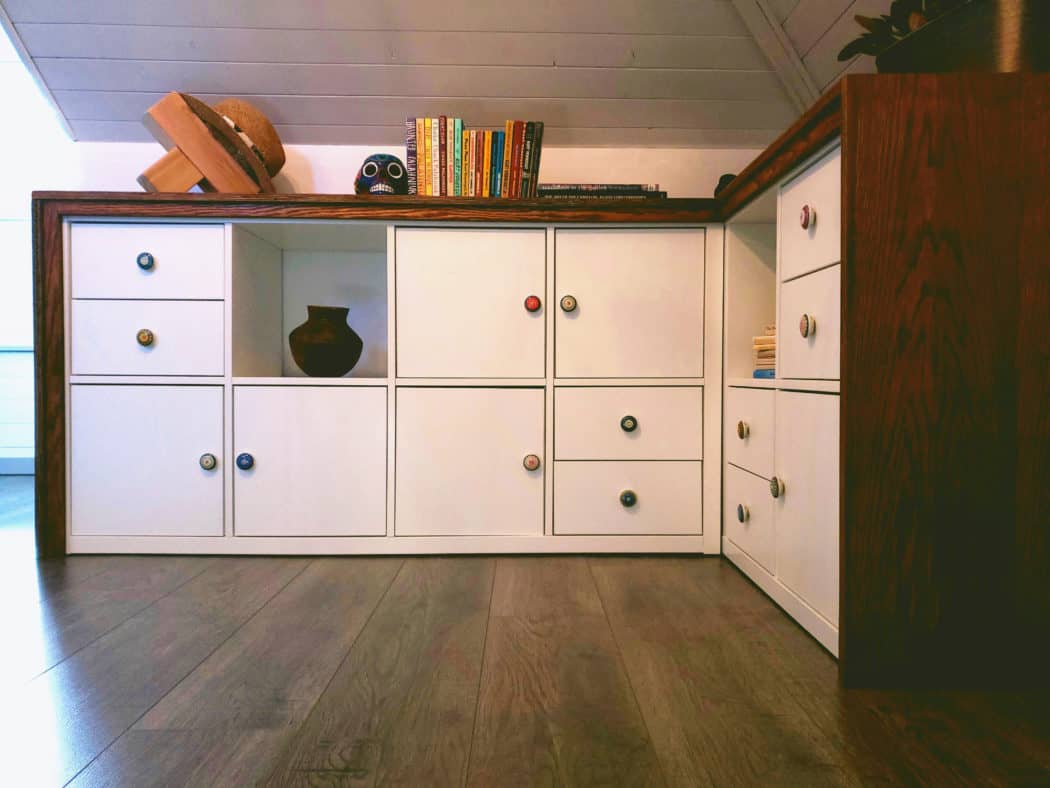
It seemed to be the perfect coincidence. We were in the midst of an office/loft renovation and a friend of ours was giving away two kallax units- one 4 by 2 and one 2 by 2. We happily took them off their hands without much of a plan, other than we wanted to ‘customize’ them in some way or another.
The design process
The two units were going to form a L-shape in the corner off the loft (if the L was upside down and backwards..). These units were going to serve as the essential storage for my home office, as well as storage the kids arts and crafts like paints, coloring pencils, and paper.
I have been working a lot with plywood lately as I love the laminated edges and industrial look it can give. So I figured this is where I would start.
Then almost simultaneously, my wife and I thought (out loud) waterfall edges would look cool, so that was added to the list. It was shaping up to look something like a countertop over the two kallax shelving units. After some more brainstorming I figured I would add some front edging to make the ‘countertop’ appear thicker with added depth. Actually that has a nice ring to it, so from here on out, I am going to refer to it as the ‘kallax countertop’.
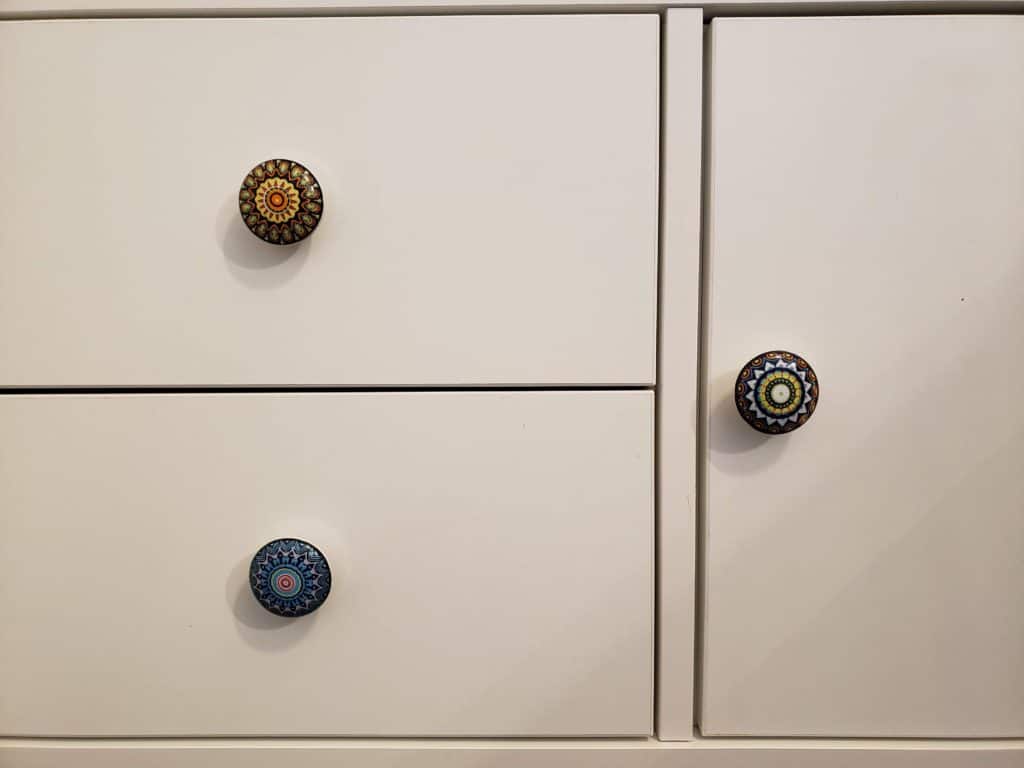
Then the question was, do we want to leave the open shelves, have cabinets, or drawers? Or maybe a combination of them all. IKEA makes each option in order to customize the kallax unit to your needs. Is there anything IKEA doesn’t think of? We settled on a combination of all 3. So after a trip to IKEA, we picked up 6 cabinet doors, and 4 drawer units at a total cost of $140. No offence to IKEA, but the included knobs are boring and rather plain. Our loft design needed a pop of color, so I bought some super funky knobs off amazon. Cost: $42 for a pack of 20 (which leaves us a few extra for other projects).
Before we get to the actual build, assemble the kallax units (if they aren’t already), install the cabinet doors and drawers, and add the knobs.
The kallax countertop build
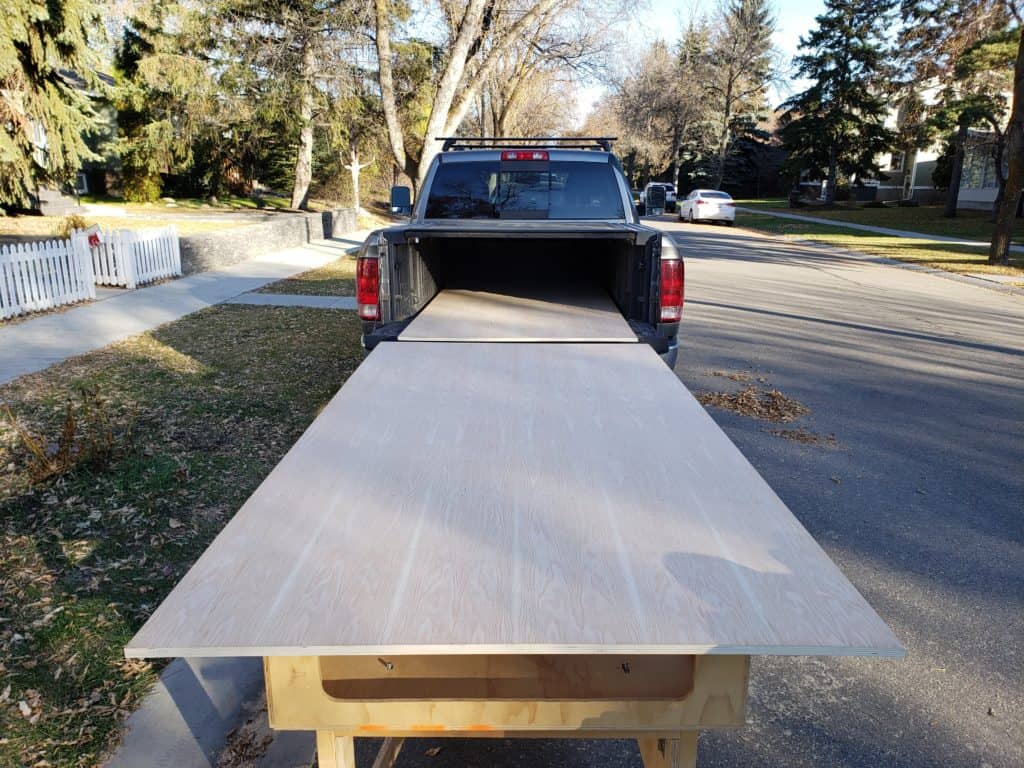
After laying out the kallax units and taking some preliminary measurements, I would need two sheets of plywood. I just finished building a floating desk across the room out of oak plywood and it used the last of my scraps. I found some 3/4” oak on sale for $75 a sheet, so we were into the project for $150. That being said, I still have 3/4 of the second sheet of oak plywood and some scraps for another project down the line. So you could say the cost is more like $93 bucks. I’ll give you a running total of the costs so you have an idea what this project will set you back (prices will be in CAD).
Now we have everything we need and it’s time to start building. Cost up to this point: $275 loonies.
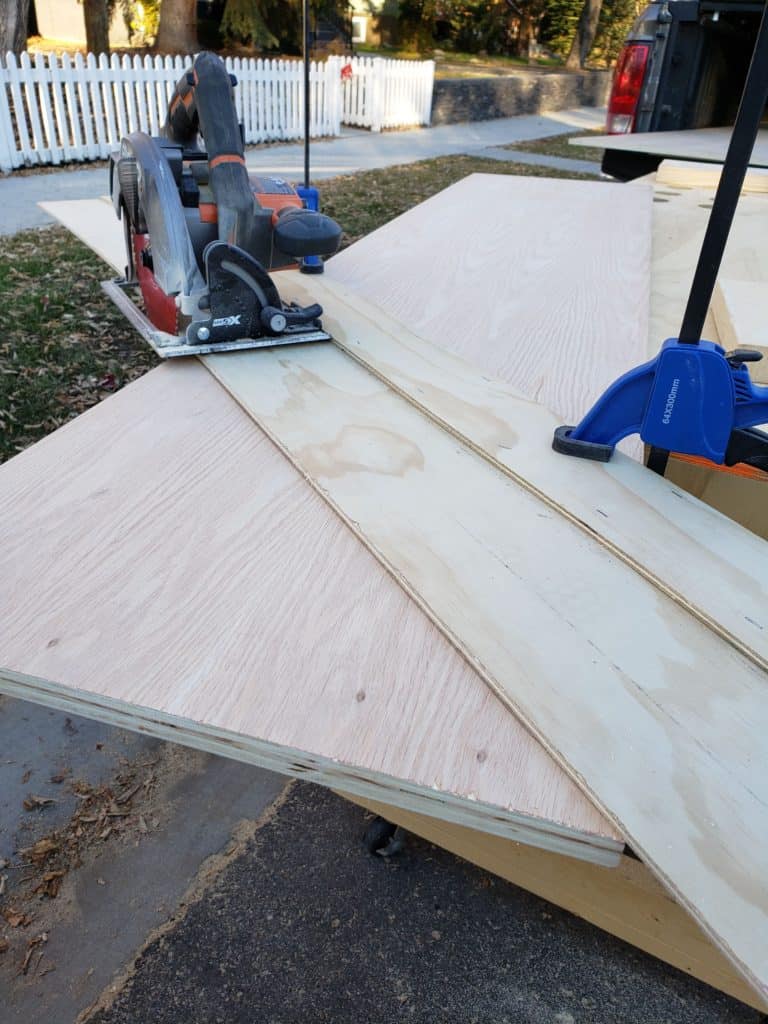
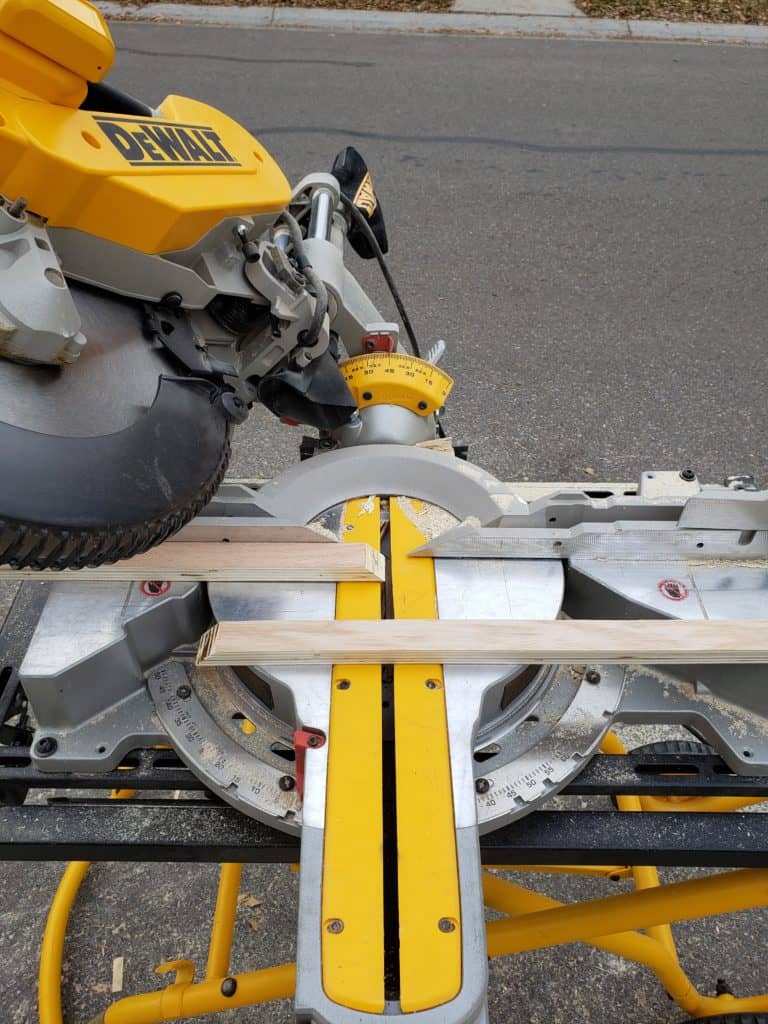
Step 1- Cut the top sections of the kallax countertop.
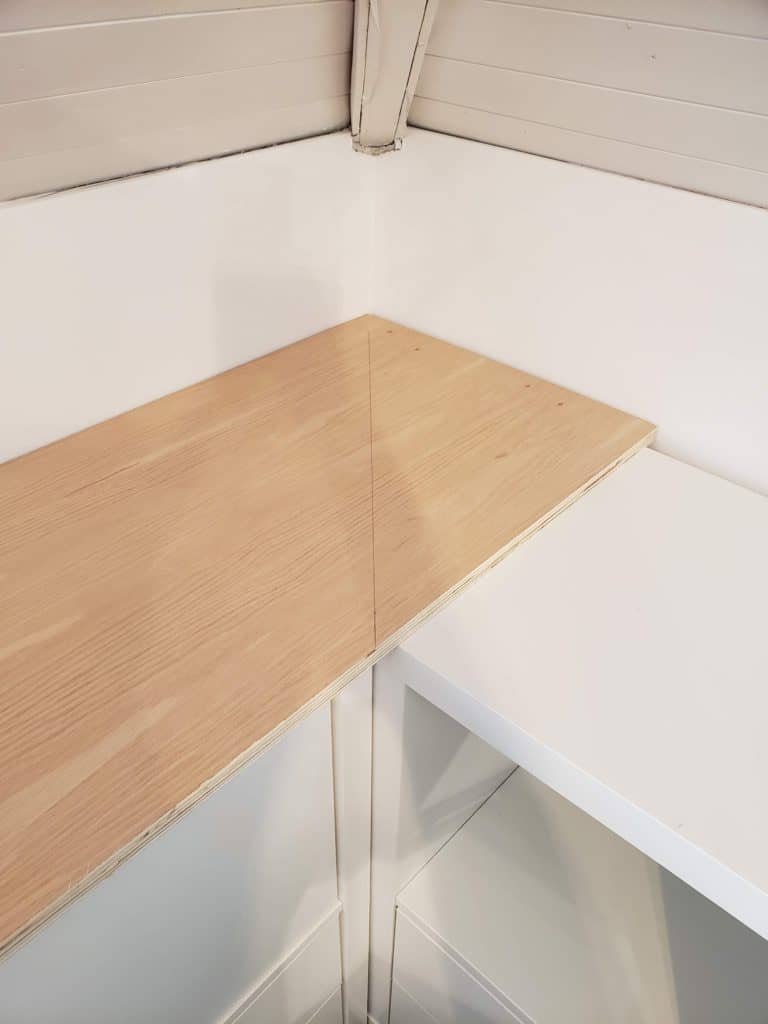
I started on the longer section and cut it to length. Once it was set in place, I could determine the angle I needed in order to create the miter cut for the corner. Keep in mind I am working in a very old house and none of the corners are even close to 90 degrees. If you are dealing with a nice square corner, your miter cut would be at 45 degrees.
A quick side note for cutting the miters. The countertop was 16.5″ deep which is way more than a miter saw can handle without having to flip the board. This is where a track saw guide comes in real handy. You don’t need to own one (I don’t), and it is super simple to make your own (check out #2 on this list). Clamp it down to your piece and you will get a straight cut every time.
From there, I cut the second top piece of the countertop, for the 2 by 2 kallax unit. Once again, I started by cutting the piece of plywood to full length. I really wish I had a picture of this next part, but I will try and explain it the best I can. I placed the first piece (already cut) on top of the larger kallax and set the full length second piece on top of the smaller kallax unit. From there, I slid the corner portion (of piece 2) underneath the corner portion of piece one (so you can see the miter cut on the first piece). This way I could use the first miter cut as the guide for marking the second cut. Clear as mud!?
Once the first two pieces were cut, rough fit them in place and make sure they are snug to each other (there should only be small cracks between the mitered edges) and the wall.
Step 2- Join the mitered top pieces
The area underneath the corner has no support so I wanted to ensure a tight bond between the two pieces. I suppose I could have added some 2×4’s on the wall to support the corner, but I just thought of this now, a little too late…
In order to create the tightest (and strongest) joint possible, I used a tool called a biscuit joiner. This is a special type of saw that carves out a groove on the edge of a piece of wood. An exact mirror is carved on the second piece of wood, and a wood ‘biscuit’ is glued into the groove. This ‘biscuit’ keeps the edges together at the same height while bridging the joint.
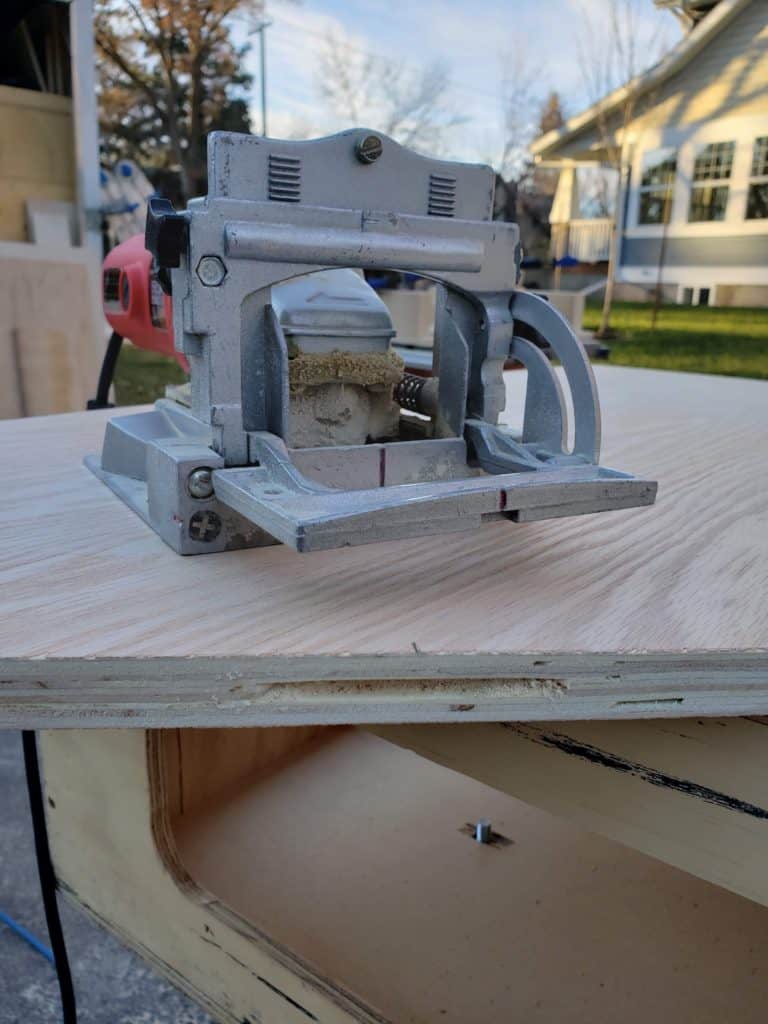
I clamped the pieces together, and the entire countertop was also clamped down to my work table. Let it dry for about 30 minutes or until the glue has started to cure.
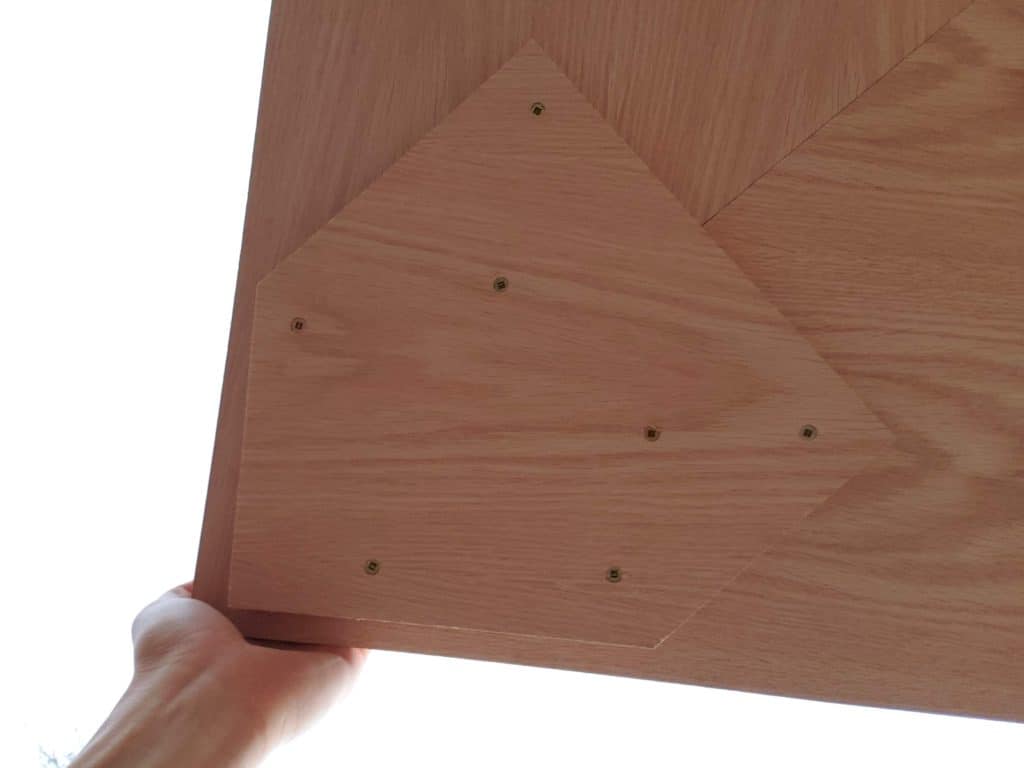
The last step in joining the two mitered pieces together is to add a cross brace underneath. As I mentioned above, the corner of my design was open so this was an option for me. Cut a scrap piece of plywood and screw it too each piece of the countertop. The goal of this is to help keep the miter joint from spreading in the future. You could always use draw bolts, but that requires routering out the bottom of the countertop. Seeing as how this project was meant to only take a few hours, I decided a wood brace would suffice.
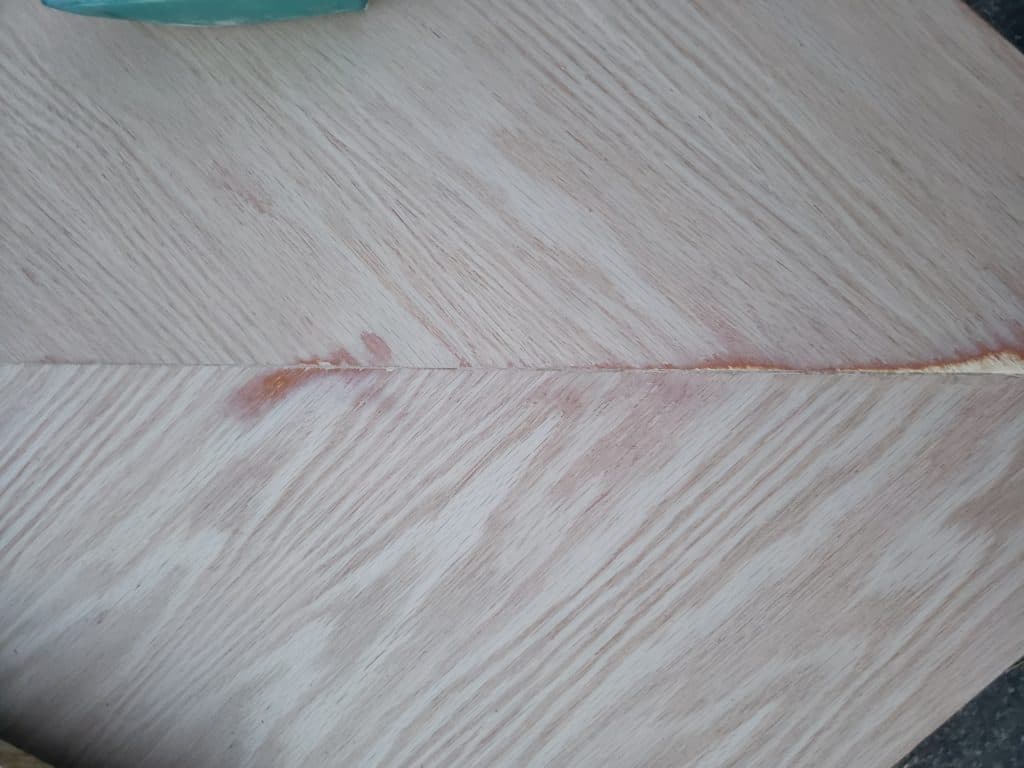
Step 3- Fill in the joint with wood filler
Interestingly enough, I don’t even remember the last time I bought wood filler. I always make my own out of wood dust and glue. Follow the steps in the linked guide to fill in your joint. One last sanding, and it was ready to move inside.
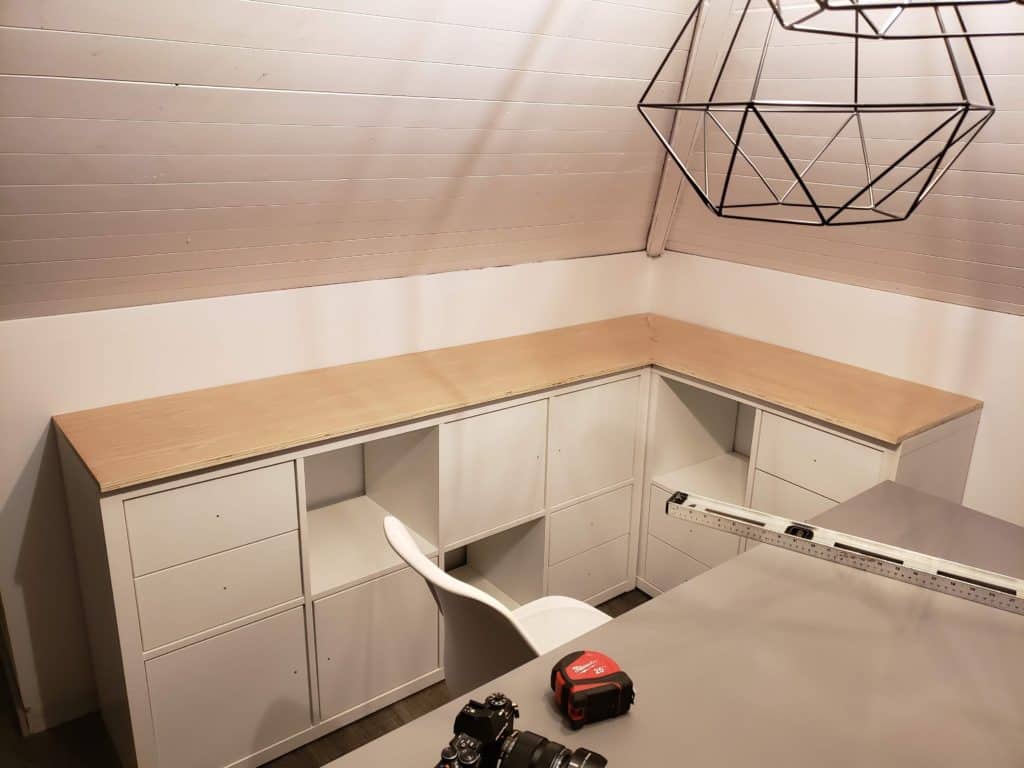
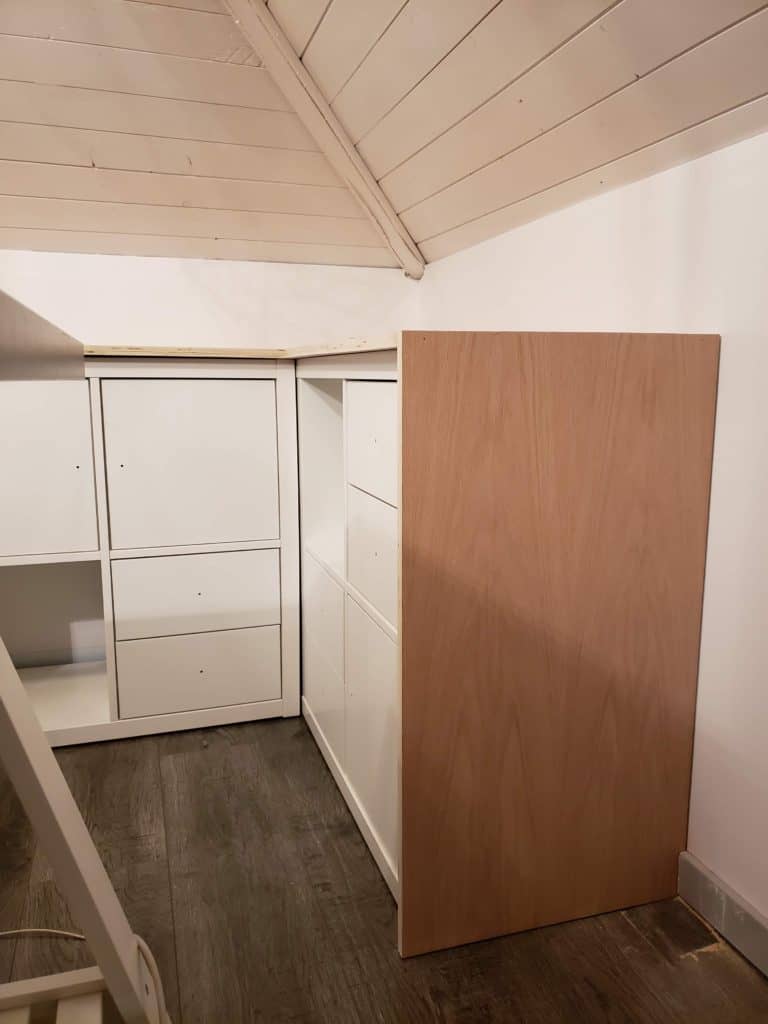
Step 4- Cut the waterfall end panels
As I mentioned above, I wanted to include waterfall edges on each side of the kallax shelving unit. Normally this would be as simple as measuring your height and your width (matching the top width). However, I was dealing with some rather crooked walls which made cutting the end panels slightly tougher. I cut the end panels to be as tight to the wall as possible, giving that custom built-in look. The lesson- make sure you take a level to your wall before assuming it is plumb and straight. Brad nails were used to join the waterfall panels with the upper portion of the countertop.
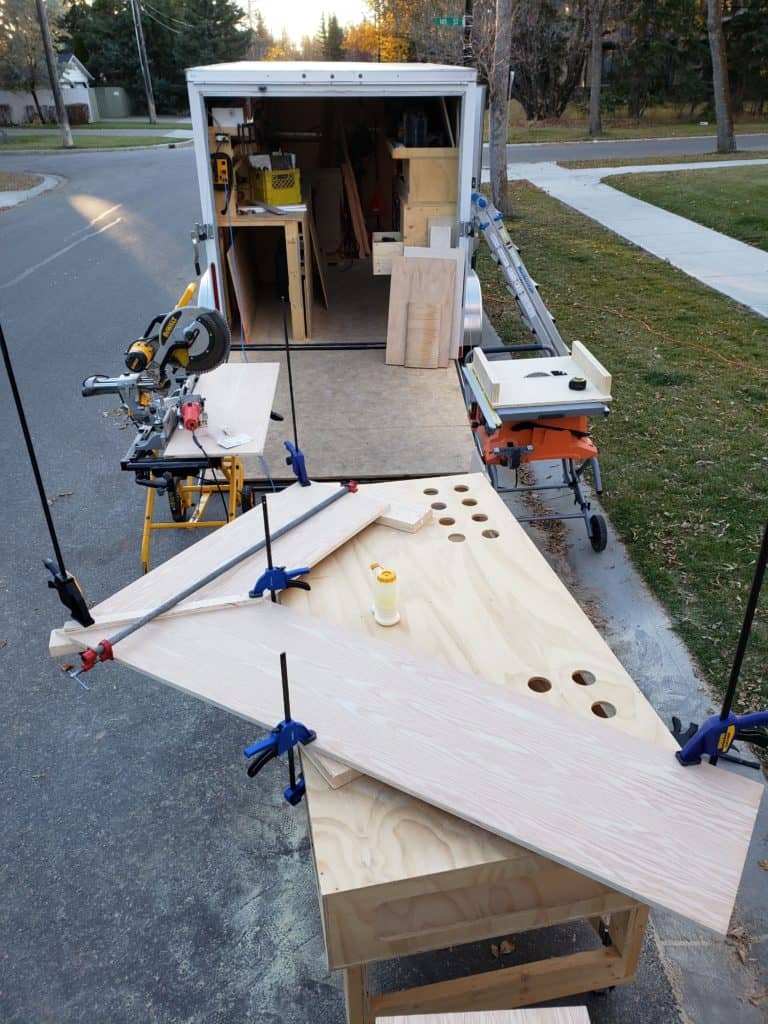
Step 5- Cut and install the front edging of the kallax countertop
After playing around with scraps, I found 11/4” to be the perfect thickness for the added edge piece. This would give the overall kallax countertop a thickness right around 2″. I set up the table saw and ripped several 1 3/4” pieces out of the oak plywood.
I measured out the length of each edge piece and used a miter saw to cut them to size. Once again, I mitered all possible corners to give it a matching look to the countertop. You want the fit to be as snug as possible, without having the force the waterfall panels in any way. The same goes for the vertical edge pieces. If they are slightly too long, they will force the countertop upward, lifting it off the kallax shelving unit.
I used several clamps to hold the pieces in place while I attached the edge panels with a brad nailer. I did this for each edge piece and the building portion was complete.

Finishing the kallax countertop
Our unit is going to get some heavy use so I stained and sealed it. I also stained it a darker walnut color to match the hand rails of the loft stairs. Also, the golden oak look isn’t my cup of tea, so just sealing it with polyurethane wasn’t an option. If you like oaks natural color, feel free to just seal it.
Stain and seal
I applied Minwax dark walnut stain with a foam brush across the entire surface. Oak takes up stain very well, so a single coat was plenty to get the tone I was after. Once it dried, I applied the first coat of clear satin polyurethane to the kallax countertop. After the first coat, I sanded everything lightly with a 220 grit sandpaper. I repeated this process once more, then the project was complete!
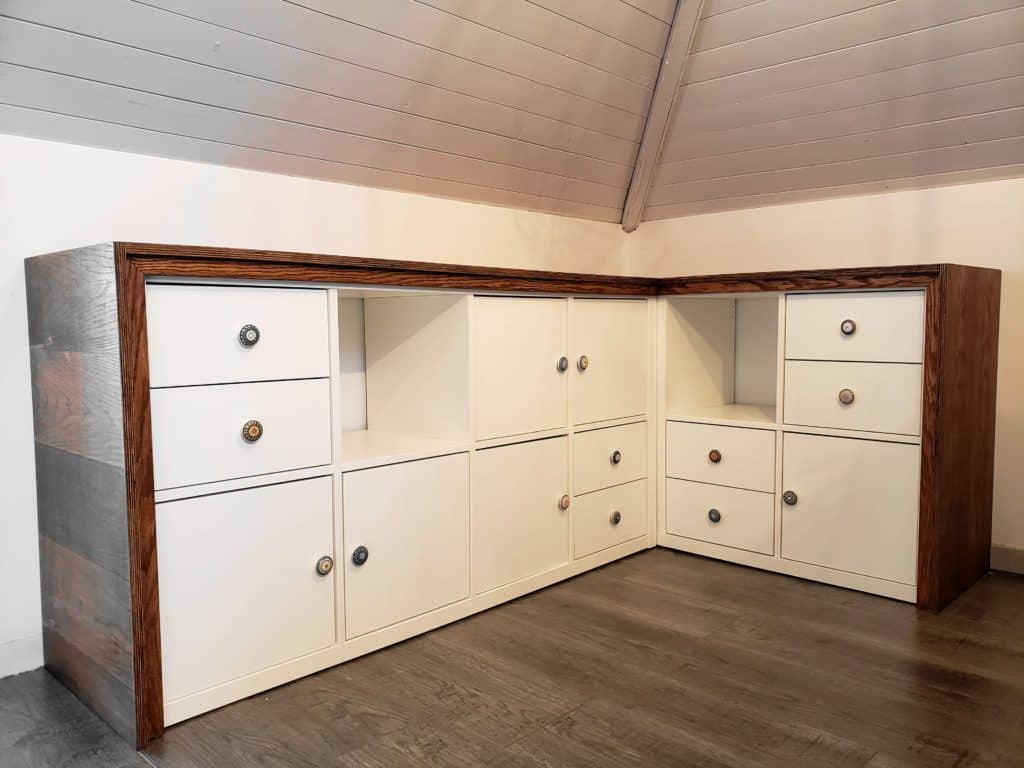
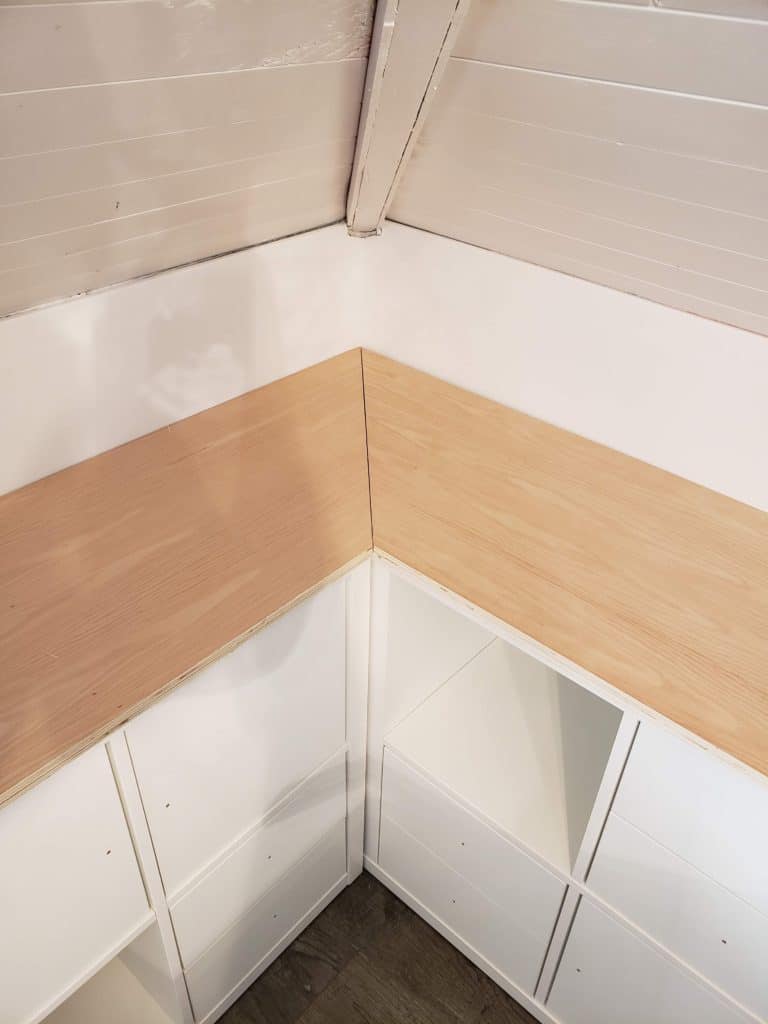
I am really happy with how the kallax countertop turned out, it is exactly the look we were after. Plus it’s almost impossible to tell this is a normal IKEA kallax shelving unit anymore. The cool part is the entire countertop is free floating. There are no nails or screws holding it to the kallax unit. The weight keeps it in place, and the baseboards keep the waterfall panels from splaying outward.
Hello
I want to do a project like this. I am not great with woodworking stuff, would I still be able to do this?
Greetings
It could be a challenge, but I think with some patience you would be happy with the result. The hardest part is just getting started and giving it a try!