

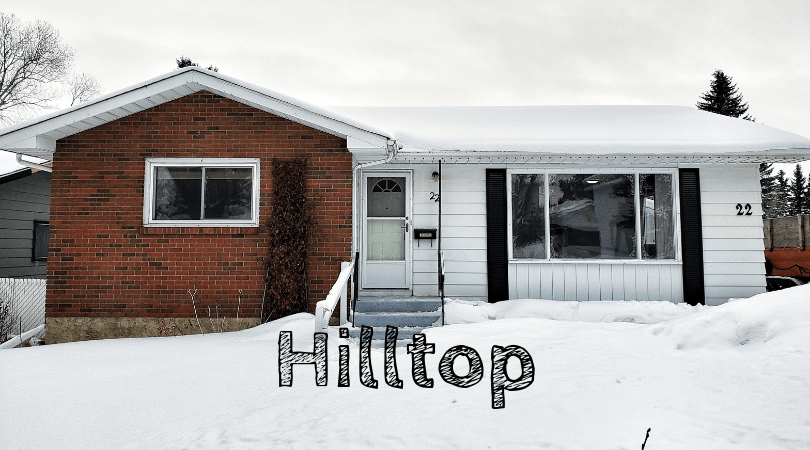
Better late than never, right?! I figured it was time to give an overall update on Hilltop, as well as discuss the renovation plan for this quaint home. In case you missed the last post, watch the house tour before we started renovating.
We are just over 1 month into the renovation and let me be the first to tell you, it’s been a whirlwind. I had some grand plans when we first took possession. I was going to write blog posts every week, make videos, bang out Instagram stories and photos, and you know actually renovate the house. Well it has been a learning curve trying to balance everything, and in all honesty, the actual renovation has been the priority hands down. It is after all my business and what actually pays the bills. I also came to realize not many people care about the initial stages of renovating. As it turns out demo, plumbing, electrical, drywall and painting aren’t exactly exhilarating to read about or watch.
However, now we are in the exciting stages- everything is starting to go back together! That means, kitchen cabinets are going in, countertops are being installed, and tiling is going up. Right about now, you are probably wondering what it’s going to look like? So let’s dive into the renovation plan for Hilltop.
The renovation plan
I dropped a few hints in the initial house tour, but in this post we will go into the details about the renovation plan, as well as the design and finishes throughout the home.
The goal is a modern farmhouse aesthetic for the overall design. This will be dominated by whites and light greys, and then finished with black accents and wood tones. This might be my favorite style to design in. It’s classic and timeless.
The mechanicals
We might as well get the boring stuff out of the way right at the start. And though it might be boring, this is probably the most important part of the renovation. It’s the stuff we can’t see that leads to the biggest problems, and I always want to pass along the best and safest product at the end of the day.
Electrical
We have done an electrical panel change and thorough inspection of the complete electrical system. This included removing hidden junction boxes (big no no!) and cleaning up excess wiring. We have also added new recessed LED disc lights across every living area of the house (living room, kitchen, basement rec room, as well as laundry area). Further, every plug in the house has been swapped for tamper resistant outlets.
Plumbing
Hilltop has some pretty cool plumbing, and something I had never come across before. The entire house was run in copper piping. You might be thinking, so what mine is too. At Hilltop, the drains, main stack, and vent lines were also run in copper, which is definitely unique around here. In my area, water lines are often in copper, but any drains and stacks are typically run in cast iron pipe (older homes) or ABS (newer houses). In the end, we cleaned up some of the excess water lines, removed the old water softener, and moved the laundry drain line. We also moved the kitchen drain and vent- I’ll address this below in the kitchen section.
The important part of doing mechanical work- they were all done above board by licensed professionals, permitted and inspected. This might be my biggest pet peeve with fly by night renovators, skimping on permits and proper inspections. Yes it costs money, but it is critical for many reasons, including insurance, city assessments, and especially peace of mind for home owners.
The bedrooms
The bedroom walls aren’t moving at all, but we are going to give the rooms a complete face lift. This means, all new floors, paint, trim, and lighting. We also ended up going with new interior doors across the main floor.
We are going with a neutral paint color on the wall- Touch of grey from Behr. Both the interior doors and the trim will be finished with ultra pure white, however in different finishes. Trim should usually be painted with a slightly shinier/glossy finish. At Hilltop, all of the trim will be done with a satin finish.
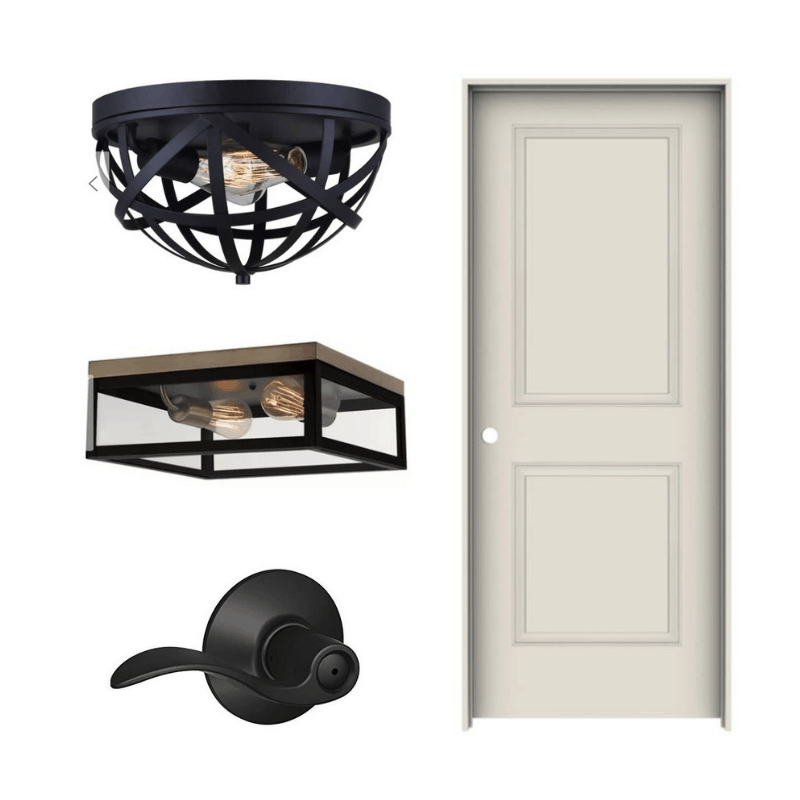
The bedrooms sound boring don’t they? We thought so too, We needed a punch to bring them to life and differentiate them from any other renovated/new build house out there. If you remember from the house tour, the closets at Hilltop have these awesome 8′ metal doors. We ended up keying in on these and highlighting them. They are painted in a semi-gloss black to really make them stand out. To keep the black from looking out of place, we also added black hardware to the interior doors, as well as black light fixtures.
The Kitchen
This is a room where a true renovation plan will save you time and money. You can try and wing it, but I guarantee you will run into more problems and headaches.
The kitchen is the heart of the home and often where we spend most of our time. Therefore, it needs to stand out in it’s design and function.
Making a kitchen look good is one thing, but making it look good and remain functional is where the challenge lies. At Hilltop, we aren’t working with the largest of spaces, but it is a great square footage in relation to the overall house size. Even more, once we removed the wall between the kitchen and dining room, it felt HUGE!
The layout
The best kitchen spaces are designed around the triangle. That means the sink, fridge, and range are in somewhat of a triangular shape. Believe it or not, having a functional kitchen can make working in it more enjoyable.
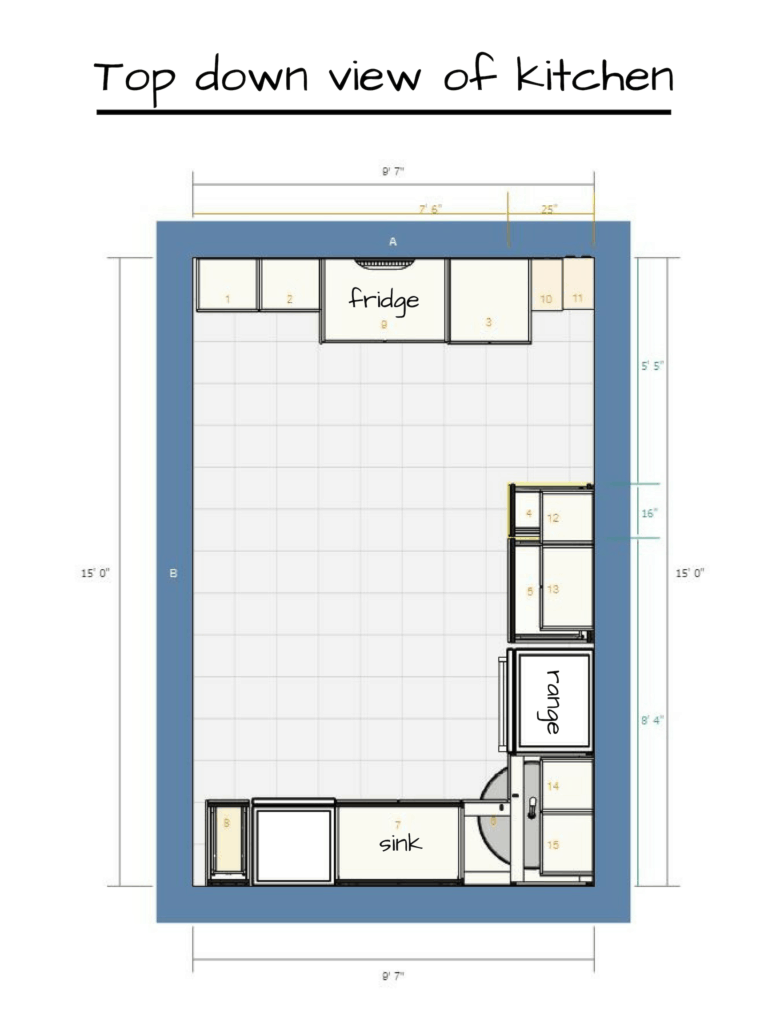
The photo above shows the general renovation plan for the kitchen layout. We are relocating the fridge from the beside the range to the back wall. This makes for a great work area next to the range. The range will also nudge over a little, making room for a full corner cabinet. The best part, the new kitchen will have a permanent dishwasher, not one on wheels….
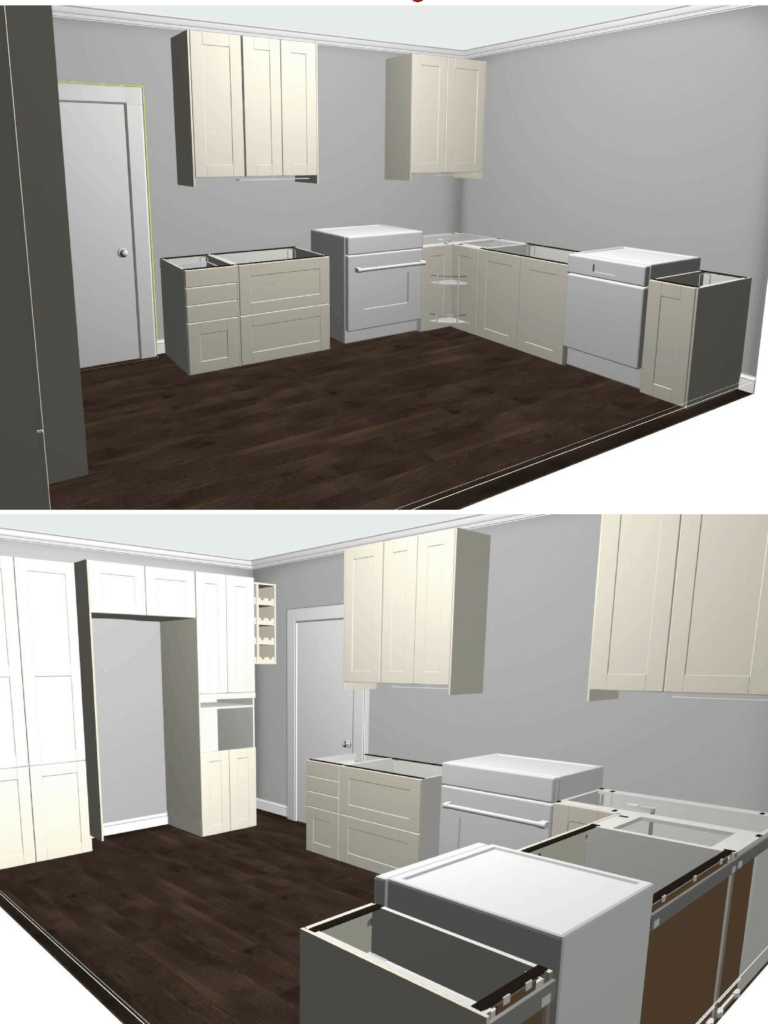
Even though IKEA’s kitchen planner can be a pain to use at times, it does make life easy when it comes to visualizing their kitchens. There is also a large window above the sink cabinet, even though it wasn’t added in the 3D renderings. The gap above the range will be filled by a custom range hood, and the gap under the wine racks will be filled by a custom cabinet unit for cookbooks, as well as drawers for potatoes and onions.
I always try and incorporate something unique in each kitchen. Not only does it prevent it from looking like an off the shelf IKEA kitchen, it helps give the house some unique character. In this case, we not only have the unique range hood, built-in bookcase/drawers, but also a custom farmhouse butcher block island.
The design
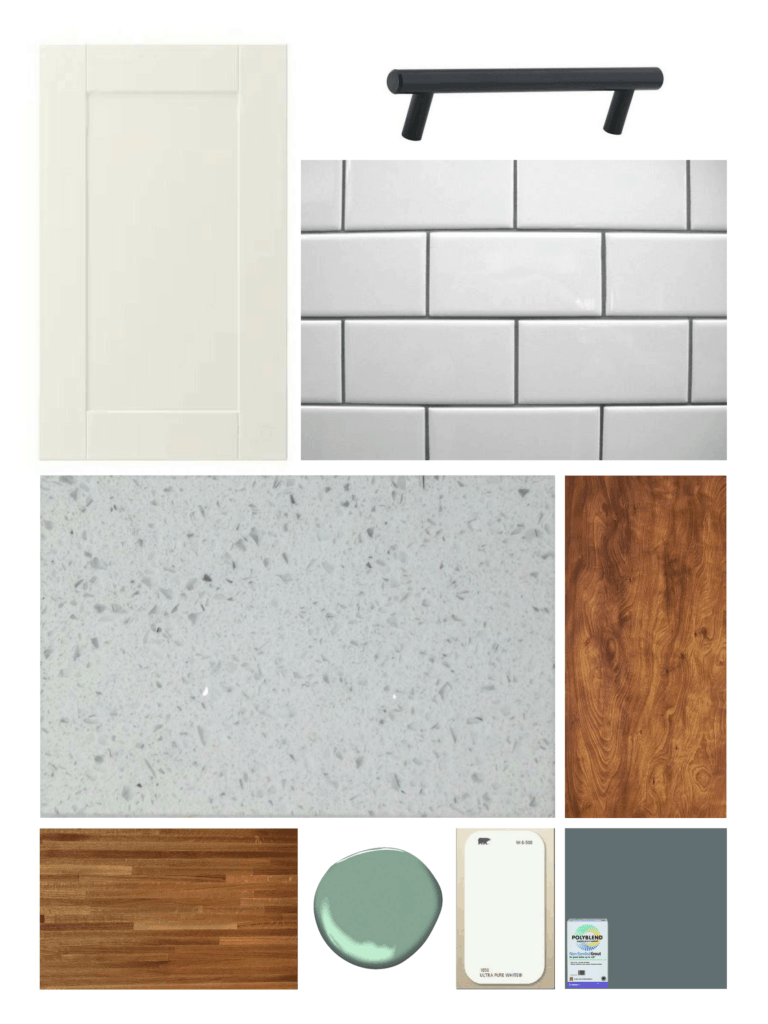
I want to keep the kitchen as light and airy as possible, again keying in on that classic and timeless look. This means keeping the tones predominantly white and somewhat traditional. As you can see from the photos above, we are going with white shaker cabinet fronts, with matte black hardware. The shaker style cabinet has been around since the dawn of time and never seems to go out of style. I knew I wanted to put quartz countertops in the kitchen, and we wound up going with Bianco Galaxy Quartz. I wouldn’t normally choose a quartz with some shine to it, but it’s going to give just the right amount of bling to this kitchen, plus it was within budget. Above the stone, we’ll go with classic subway tiles separated by delorean gray grout. The kitchen renovation plan for Hilltop will be finished off with wood accents and drops of green to warm up the final design.
The main floor bathroom
The house is a very typical bungalow layout- 3 bedrooms and a bathroom on the main floor. Therefore, with only one bathroom on the main floor it really needs to shine and stand out from the crowd. The beautiful thing about bathrooms is they are a great place to be bold and a little funky.
We aren’t changing the layout of the bathroom at all, thus all of the plumbing can stay right where it is. This saves us a good chunk of change, and also means the bathroom renovation plan will be largely aesthetic.
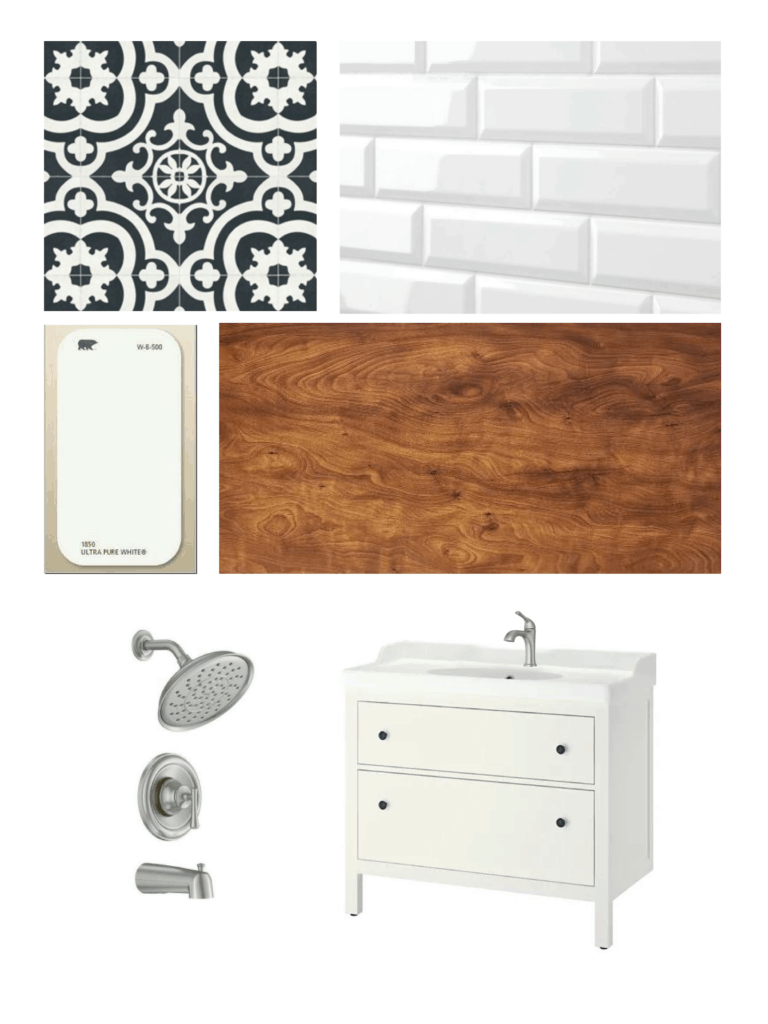
Much like the rest of the house, the main floor bathroom needs to feel large and inviting. The tub/shower surround will be tiled in 4×12″ beveled subway tiles.. The wall behind the vanity, and doorway will be wrapped in shiplap, similar to the accent wall of the built-in home bar. The floor will be a real standout- a patterned black and white ceramic tile we found for a steal from Lowes. All of the fixtures will be in a brushed nickel finish. For the tub/shower we decided on the Moen Ashville. For the vanity, we went with A Pfister Ladera centerset faucet. Lastly, some floating wood shelves and a wood framed mirror will help warm up the space and tie in the design with the rest of the house.
The basement
The renovation plan for the basement is all about creating space and opening things up. It was broken up by too many interior walls leaving small, relatively useless rooms. We will knock down 3 separating walls to create an open rec room. The floors will be finished with luxury vinyl plank. This is a great option for basements or any area that could have high moisture. We will reuse several of the old kitchen cabinets to create a funky dry bar, giving the basement a focal piece. The laundry room (or lack there of…) will be removed from the base of the stairs. The new laundry set will be stacked in a closed in area next to the washroom, finished off with a sliding barn door. The remaining space at the bottom of the stairs will form a small mechanical closet with access to the electrical panel and plumbing clean outs. Finally, the basement bathroom will get a refresh with new flooring, toilet, and vanity.
No Comments