
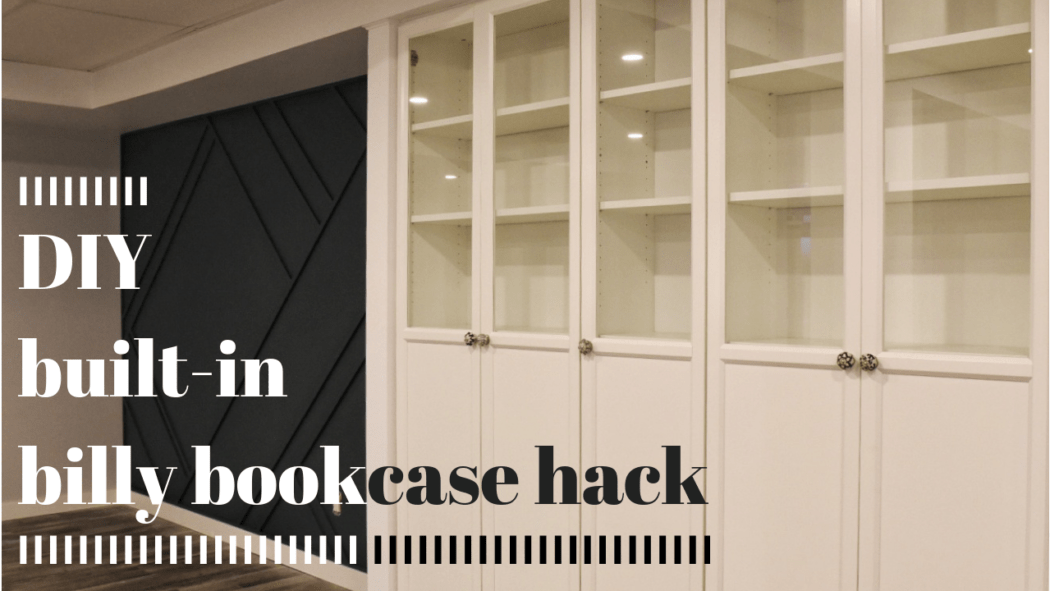
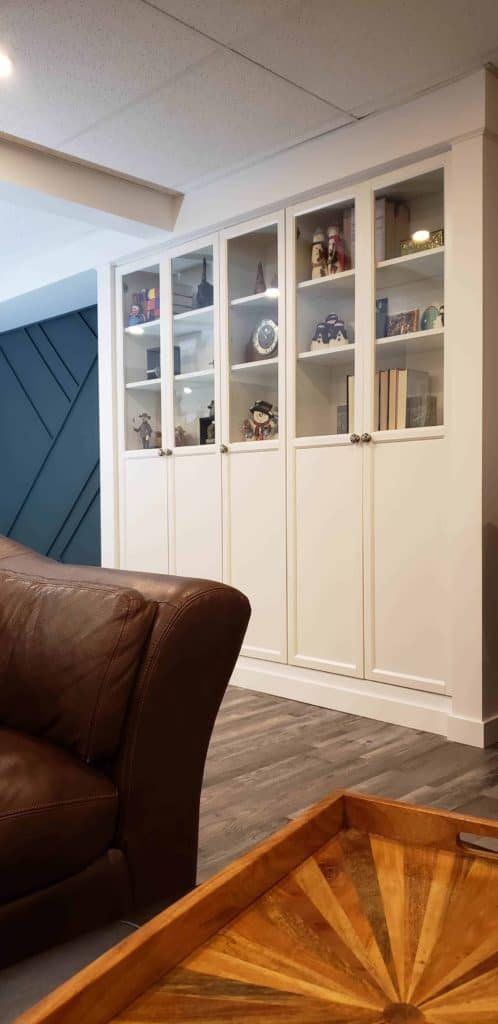
What’s going on homestudders! I have finally finished up a project that I have been dying to share- it’s the built-in BILLY bookcase hack.
As you may or may not know, we have been hard at work renovating the basement of the Beige Bungalow, and one of the main projects has been a built-in BILLY bookcase. This project has been a little different from ones in the past. In order to complete this project, we needed to finish, or at least start, a bunch of other jobs mid-way through. For example, before we could install the billy’s, the drywall, taping, mudding, sanding, and painting needed to be complete. In order to finish the inside quarter-round trim, the accent walls had to be complete (more on that later). Before the baseboards could be installed along the bottom, the flooring needed to be finished. On and on it went! In the end, all of these side projects ended up pushing the built-in BILLY’s to around a 4 week completion mark.
But the time has finally come to reveal the completed built-in BILLY bookshelves. And before I get into the step-by-step process to complete this project, have a watch through our video and make sure to smash that subscribe button!
Materials:
- 2″x4″ framing studs (for walls and base)
- MDF (medium density fiberboard – for trim work)
- Inside quarter round (upper finishing trim)
- Billy bookcase (two 30″ and one 15″)
- Super funky black and white porcelain knobs
Tools:
- Mitre saw (I use a Dewalt DW780)
- Table saw (I used a Rigid here)
- Circular saw (any will do as long as it has a good shoe)
- Ramset (any tool capable of firing nails into concrete will do the trick, just be sure to also pick up the cartridges and proper nails)
- Brad nailer and compressor (here is an awesome deal)
- Impact drill
- Trigger clamps (I love my 12″ Irwins)
How to build a built-in BILLY bookcase
I am going to add a quick preface here. In my build, I extended the bulkhead that was already existing in the basement. I don’t want to go off on too much of a tangent but the reason was two-fold. 1) Aesthetically it looked far better continued above the BILLY’s, and 2) it gave me the correct height for building in the bookcases without extensions.
This may or may not be something you are planning on doing for your own built-in BILLY’s. I am not included this in the step-by-step instructions, but do think about how you plan to finish out the top of your build. It will all come down to the ceiling height. If you have any questions, shoot me a message and I would be happy to help problem solve or brainstorm!
Step 1: Frame out the walls and base
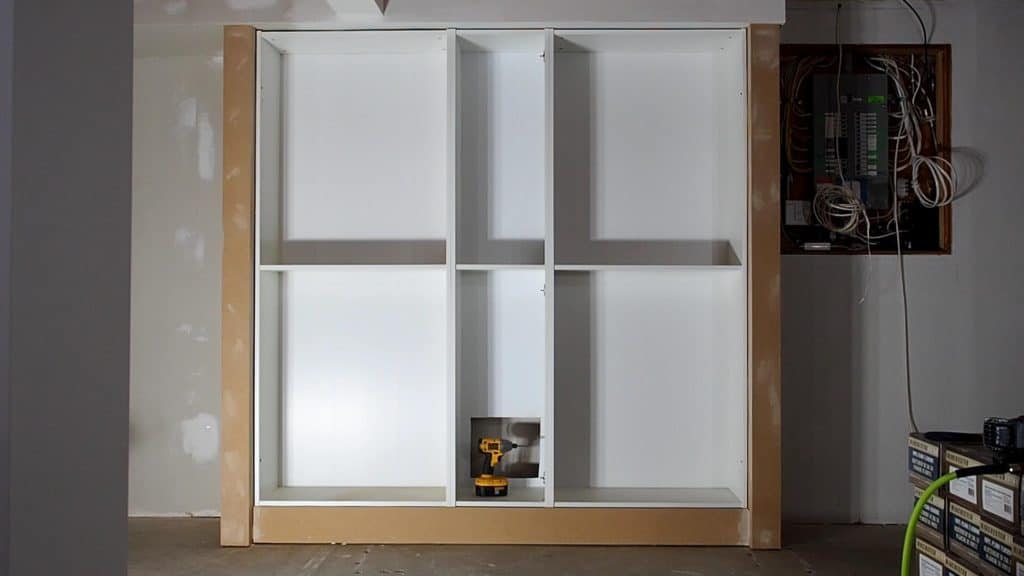
I started out by framing out the two walls that flanked either side of the bookcase using 2×4’s. These walls had a depth of ~17 inches. That number is somewhat irrelevant as each build will vary. I needed to account for a drain line access point in behind the billy’s. You can choose whatever depth you would like. I wanted these to act like walls framing in the built-in BILLY bookcases, thus I needed the walls deep enough to recess the BILLY’s in about 1 1/2 inches from the finished front. Keep in mind where you add the 2×4 framing, as you will eventually need to attach the BILLY bookcases to it (Step 3).
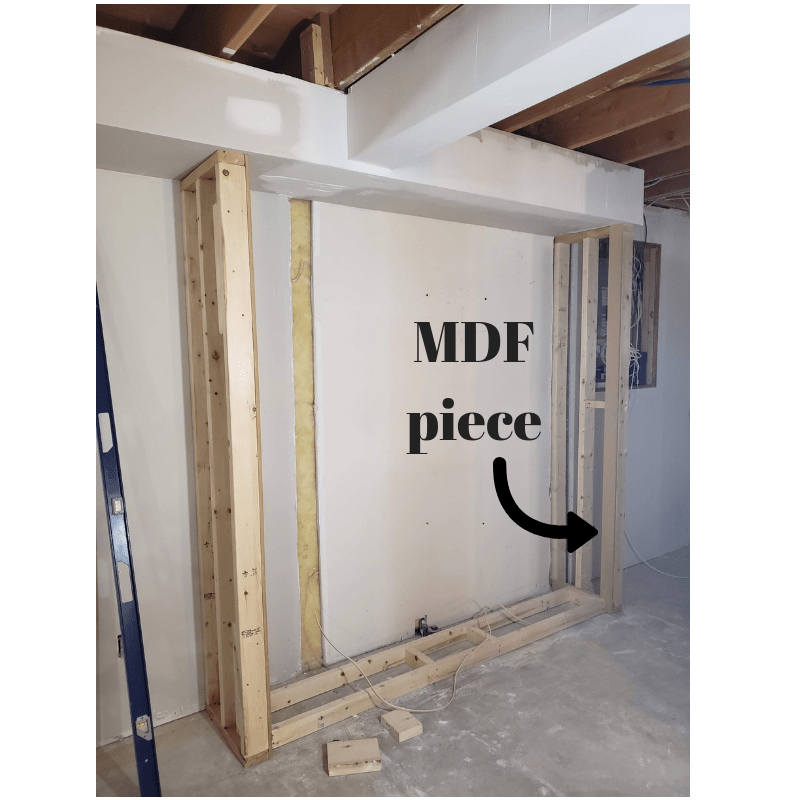
Pro tip- be sure to include a piece of MDF along the inside of each wall (marked in photo). In the video you may also have noticed that I cut my base to 3″ tall- this was only because of the height restriction from the bulkhead.
As you install the walls and base, be mindful to keep everything plumb and square. I love my 72″ box level here- it’s long and allows me to be more accurate. However, a 48″ box level would work as well. It will save you loads of headaches down the line!
Step 2: Assemble and rough fit IKEA BILLY units
This is as straight forward as it sounds. Although, I should say “stay calm while assembling IKEA products…”. It is absolutely essential that everything fits snug. It is still easy to make changes at this point.
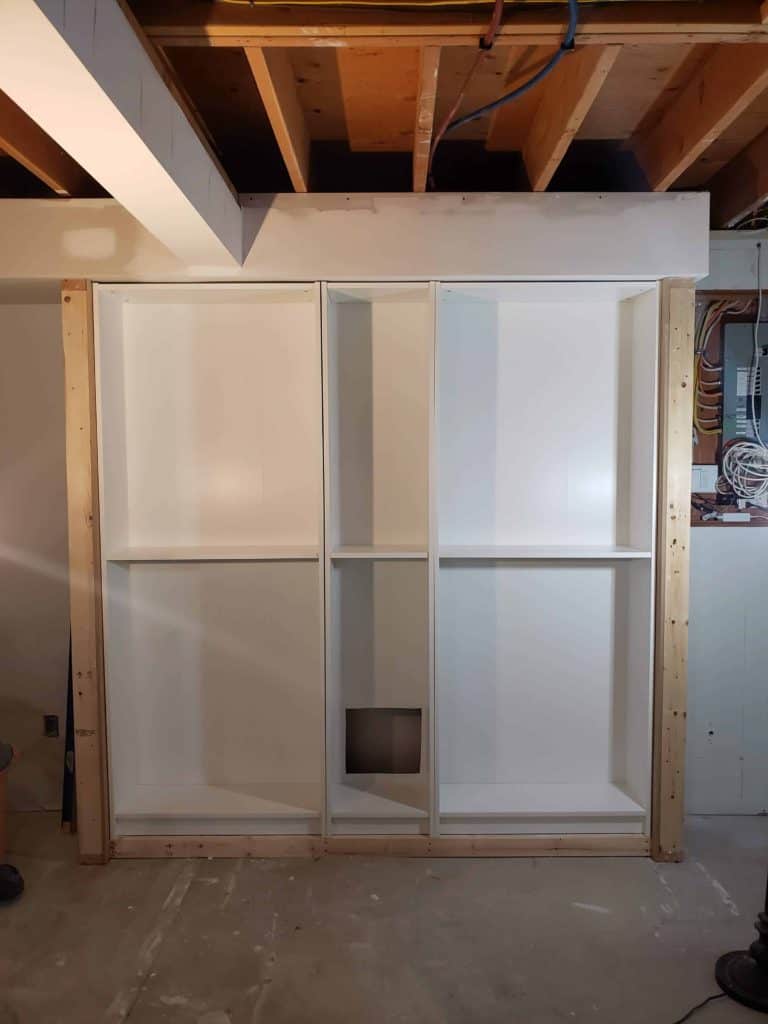
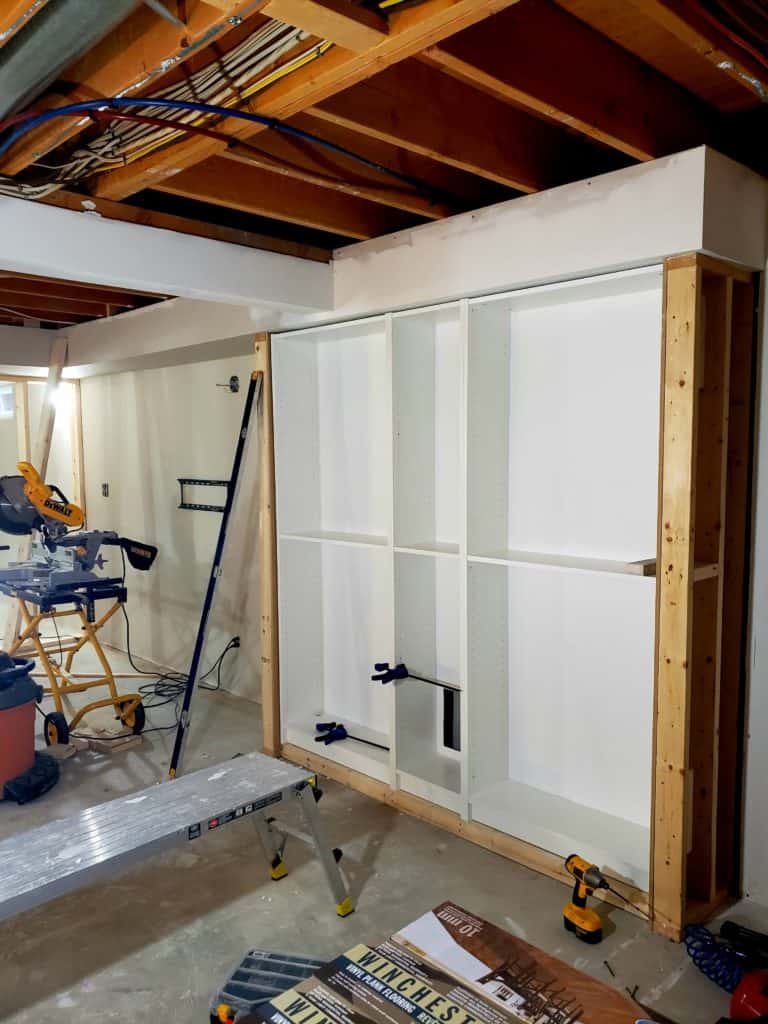
Step 3: Secure built-in BILLY bookcases
Use a trigger clamp to secure two BILLY bookcases together. Take extra care to make sure the front faces of each BILLY bookcase are flush with one another. Finally make sure to select the correct length of screw for this step. Too short and they won’t be securely tied together, while too long will pierce right through both sides of the bookcases. Secure each BILLY bookcase to the one next to it. I used 5 screws per joint, spread out over the distance. Pro tip- install screws from both directions. This helps pull the two bookcases together for a more stable fit (refer to video above for any further clarification)
If you are planning to install doors, refer to the video to see exactly where I place my screws so they aren’t in the way of the hinges.
Once all of the BILLY bookcases are joined, go ahead and secure them to the framed walls with 2 1/2″ screws. Pro tip: mark your bookcase with the stud location so you don’t miss 😉
Step 4: Complete the MDF trim work
It is time to start closing in the framed walls. I used MDF for this project because I wanted them to look like trimmed out walls and not just a drywall wall. Further, I didn’t want to be hassled by having to install drywall corner beads, along with several days of mudding and sanding.
When you install any of the trim work, double check the existing walls for plumb-ness. You may need to scribe the piece to fit perfectly. I used a DIY track along with my circular saw to make these cuts.
Now is also the time to fill any of the joints and nail holes with drywall putty. Let it dry, and then give everything a good sanding. When it is complete, you should barely be able to see a joint between the two pieces of MDF.
Step 5: Prime and paint the MDF
Prime everything first! Well not the BILLY’s, but all of the MDF. Another rather straightforward step.
Pro tip- When painting, use the same paint color as the rest of the trim in the room. So whatever color the door trim and baseboards are should also be used for the edges of the built-in BILLY. This is not a hard rule, but rather a tip to help give a uniform look to the entire space.

Step 6: Install the finishing trim
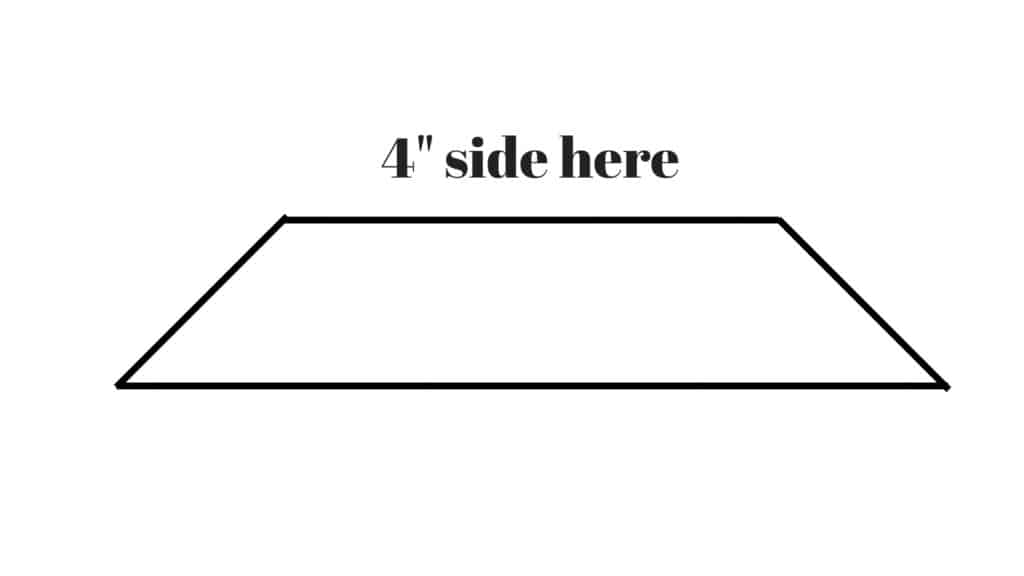
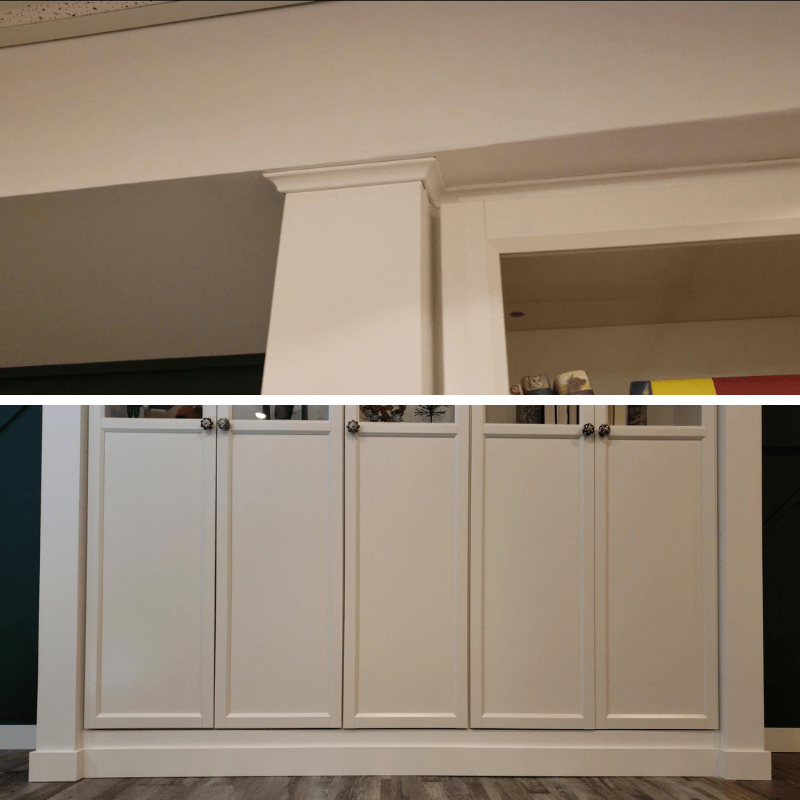
For my project, I went with an inside quarter round along the top (seen in the image below). This covers the joint between the drywall bulkhead and MDF, as well as the small gap above the built-in BILLY bookcases. When cutting mitered edges, remember that you need to account for the angle of the cut. My cuts were 4″ long, but that is from inside edge to inside edge.
For the bottom, I used the same baseboards as the rest of the basement (standard 1×4″ MDF baseboards). Again, this helps provide continuity to the entire space, tying the built-in BILLY’s with the rest of the renovation.
All of the trim work was installed with 2″ brad nails. Fill the gaps and nail holes with drywall mud, give it a light sand, and then finish off the new trim with a final coat of paint.
I should also make note- all of the trim work was given two coats of paint before it was installed. I find it far easier to do as much painting as possible before cutting and installing. It is far easier to paint one long piece of trim and then only have to patch and paint joints and nail holes.
Step 7: Install doors and hardware
You will probably have noticed that my doors were installed earlier in the process. However, what you didn’t see was that they went on and off a few times throughout the process as sanding or painting was being completed. Either way, go ahead and install the doors now if you are planning on using them. If you aren’t using doors, I would highly suggest face trimming the BILLY bookcases. What do I mean by this? Cut a piece of trim to cover the joint between the two BILLY’s. This will give the custom built-in look.
Install hardware. This is the final step of the built-in BILLY project! In order to give it a truly customized look, find some cool hardware. We went with some super funky knobs we found on Amazon. They were far cooler than anything local, and way more cost effective. Pro tip- make sure to check how the knobs fit before drilling any holes. We were unable to use the standard BILLY hardware holes as they were too close to the edge of the door, and the knobs would have hit each other when closing the doors.
And that’s it, you’re done! Well done reading anyways. Now that you know how to take the most purchased bookcase on the market and customize it, what’s stopping you from building your own built-in BILLY bookcases!
I discovered just what I was having a look for. You’ve ended my 4 day long hunt!
God Bless you man. Have a nice day. Bye