
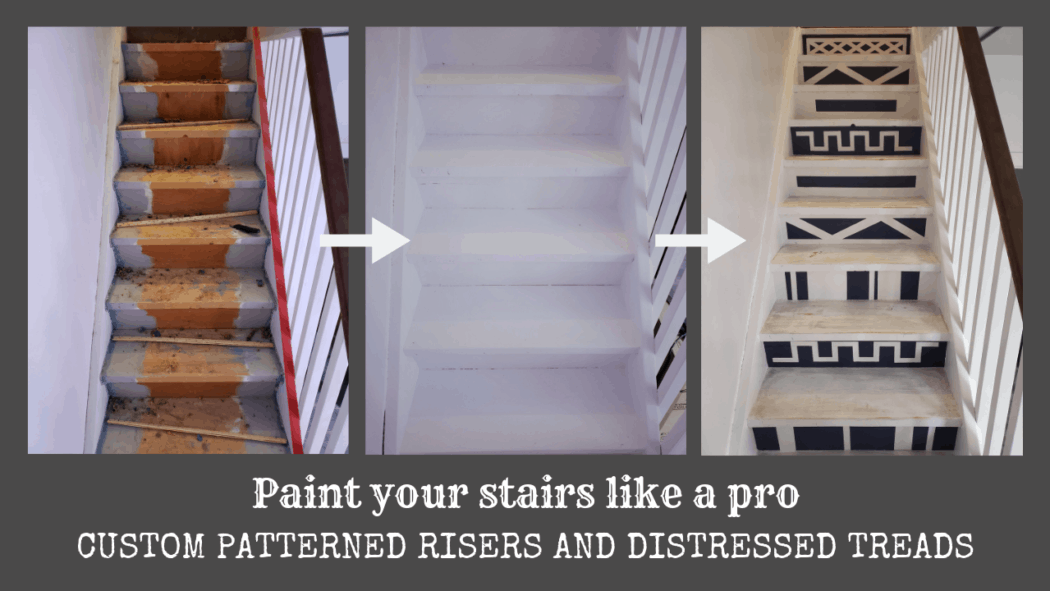
Before I dive into how I created a unique set of distressed painted stair risers and treads, let me provide a little context.
Since the completion of the Beige Bungalow, I’ve had some time to check off a few projects around our family home. We completed the final section of our basement renovation (workout area), finished up some lingering trim work in the office, and last up was re-doing the stairs to our loft. It was the last remaining carpet in the house and a magnet for dog hair. Originally, we were hoping for some old worn stair treads under the carpet, since our home is nearly 100 years old. Pairing those with some funky tiles on the risers would have made for a great staircase. Well, it was not to be. What I found under the carpet was basic 2×12″ treads, and plywood risers…not exactly anything to write home about.
It was on to plan B. Distress the stair treads myself and try make it look like they have been there for more than 5 minutes. As for the tiled risers, well a day of tile shopping and finding nothing in stock, led me to plan C.
Plan C – Distressed painted stair treads and painted risers
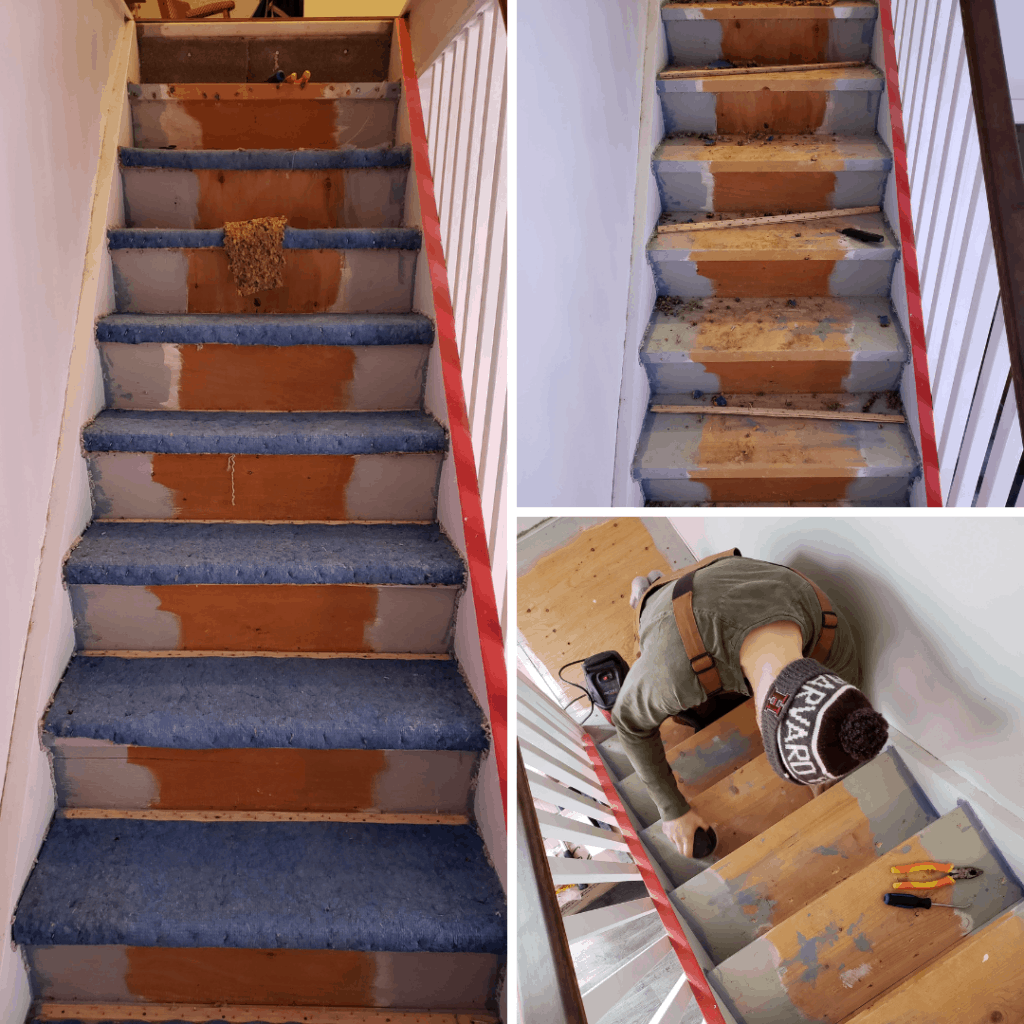
Of course we needed to finish up demo first. Once we had the carpet and underlay pulled up, it was time to remove the 3 million staples left behind. Seriously, I think there was a sale on staples when they installed the carpet, they were EVERYWHERE! Once they were out, I gave all of the treads a first pass with the orbital sander. This isn’t to get them buttery smooth, the goal was just to smooth out the real rough patches.
Fill the large gouges with wood filler
Removing the staples left quite a few deep gouges in the stair treads that needed filling before we could prime. Our avid readers are well aware that I normally like to make my own wood filler using wood glue. However, for this project I used Elmers carpenters wood filler. The main reason- I was planning to paint the treads anyways and wasn’t overly worried about matching color.
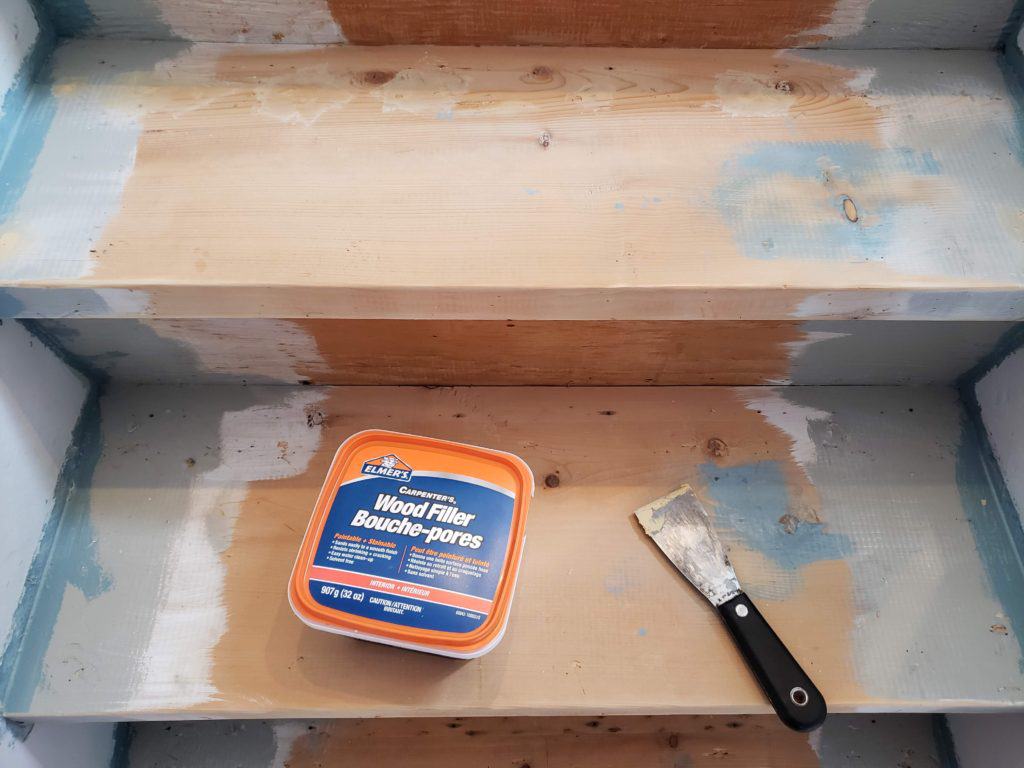
Once the wood filler is dry, everything received a good sanding with the orbital sander paired with a 100 grit sanding disc.
Prime and paint the stair treads and risers
As you can see from the photo above, there had been a few coats of various paint colors over the years. I am also guessing from the pattern that these stairs have always had a carpet runner of some sort. Primed the stairs will bring it all to an even surface moving forward.
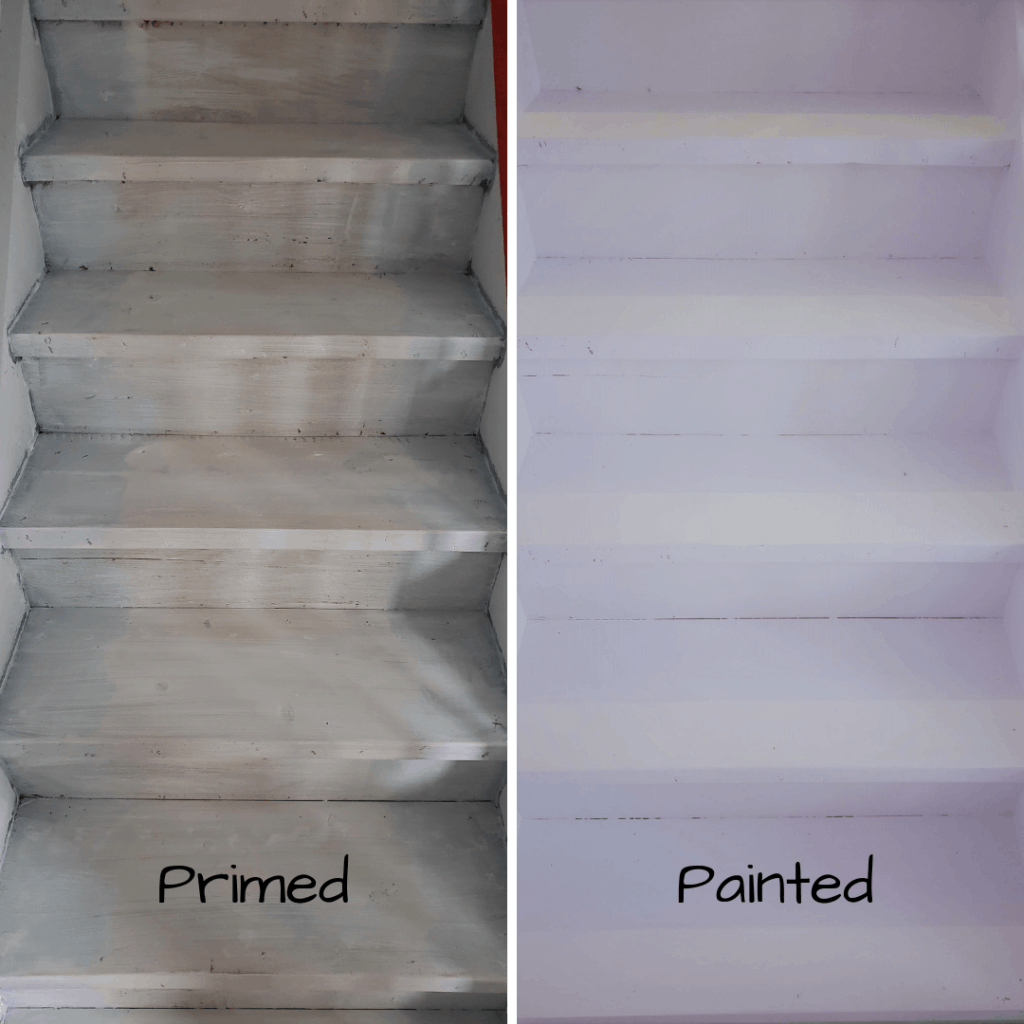
After priming, both the stair treads and stair risers received two coats of ‘Frost’ white paint from Behr. This sets a blank stage to start creating the painted stair risers, as well as the distressed painted stair treads.
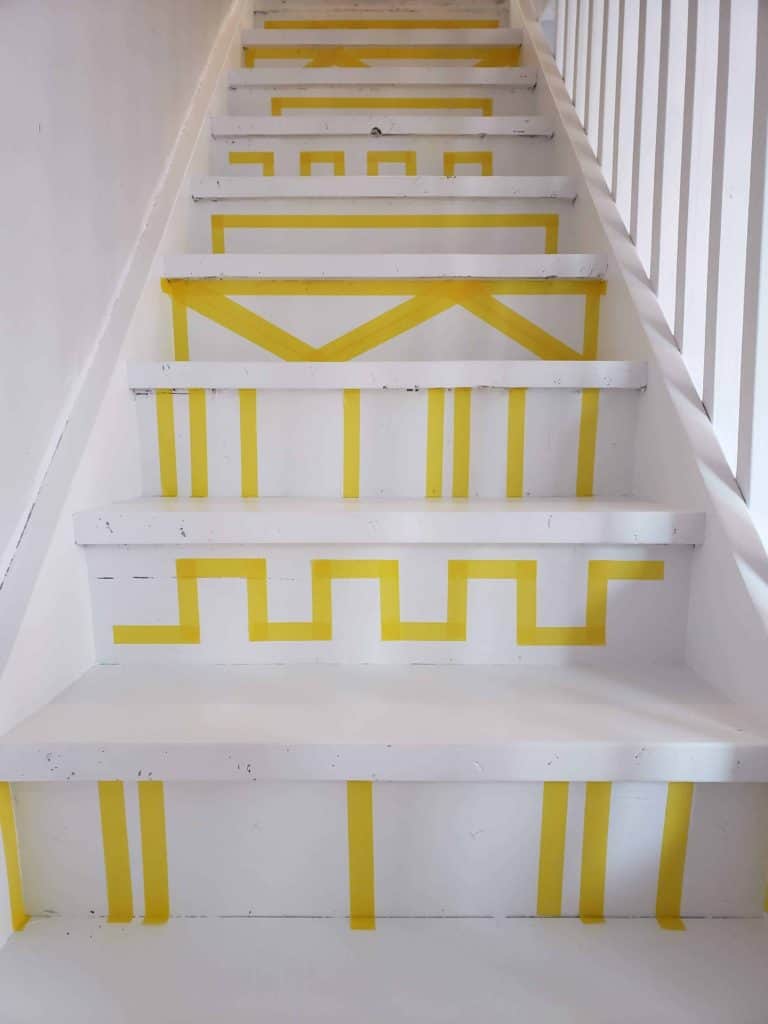
Tape out a pattern on the stair risers
This is likely to be the most time consuming part of the entire process. I wanted to create a somewhat unique design for each riser which also added to the overall process. I used painters Frog Tape, which I find to be the best tape for painting hands down. If you want to tackle this project in a weekend, make sure to get the one that can be taped on fresh paint.
Paint the stair risers … again
We decided to use blue for the risers to match the accent colors in our home. Each stair riser received two coats of Royal blue, which is the same color as the accent wall in our main living area.
The trick to this is to repeat the coats as fast as possible (most paints have a recoat time of around 2 hrs), and then remove the painters tape while the paint is still wet from the second coat. This prevents the tape from pulling any of the paint up with it.
Even with using Frog tape and moving quickly, I still wound up with some bleed through of the blue paint under the tape onto the white. So the final step was to go back and edge the white very carefully with a small artist brush. I have a set of these brushes in our painting kit for projects just like this. A standard paint brush just isn’t fine enough for this task.
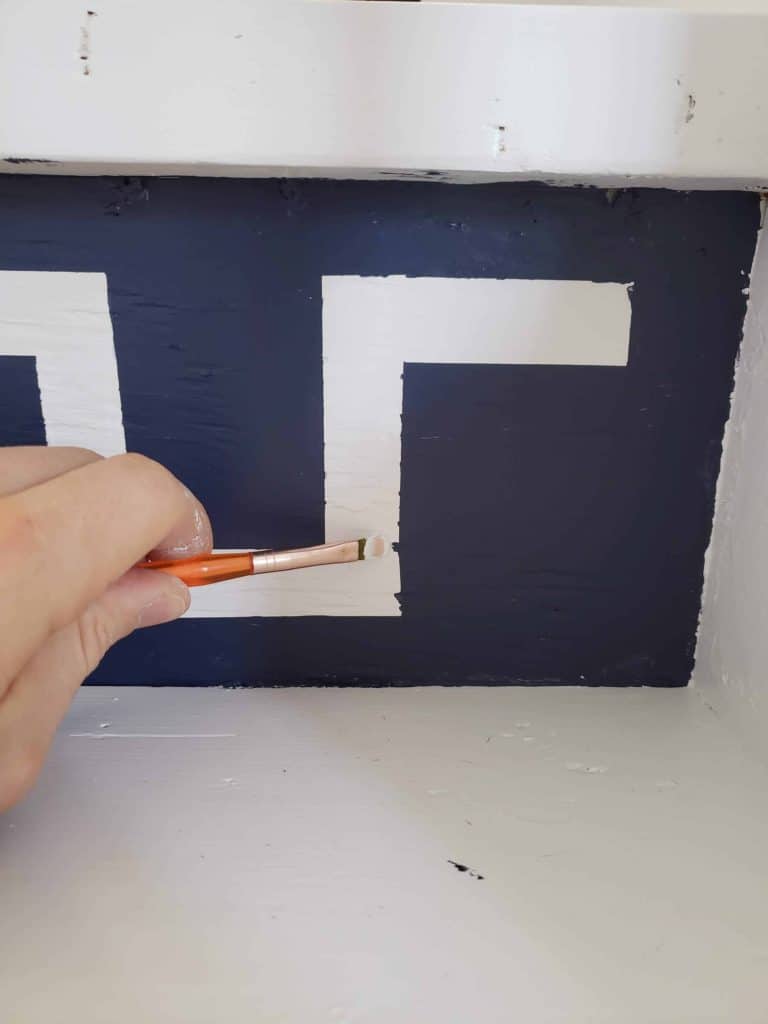
Take your time and be methodical about the touch ups. It really made a huge difference in the overall look at the end. You can see in the photo above where the blue leaked into the white, but I would say I was able to clean about 95% of them up in this step, giving a straight clean edge between the blue and white.
Paint and distress the stair treads
I don’t think there is any one technique that works best for distressing and aging wood. That is the cool part about the entire process. You can put your own stamp and personality into the project. Personally, I really like the old and ‘beat-up’ sort of look, so I’m not afraid to really go in with a scrub brush or orbital sander, even a hammer and nails, or screwdriver when needed. If you like a softer distressed look, then stick to hand sanding and gentle tools.
Grey-wash the stair treads
I painted the stair treads with a light grey wash to take away the stark white look. This also gives them an aged and almost ‘dirty’ feel which starts bringing in some of the character.
I diluted grey paint I had lingering from another project in water (10 parts water to 1 part paint). This is far more diluted than normal white-wash, but I wanted watery paint that would be easy to spread around on the stair tread. A couple brush strokes to spread out the grey initially, followed by a standard bristle scrub brush to give it some good lines. I made sure to get right to the edges of the stair tread, which helped it look more natural.
2. Distress the painted stair treads
The distressed look is largely up to your own liking. As I mentioned earlier, I enjoy a really beat up and worn look (especially for stairs). In order to do this, I used my orbital sander to sand the entire surface of the painted stair tread. From there, I could really dig in to certain areas, exposing the wood grain below. In particular, I tried to focus in on knots and areas of interest in the wood. That, along with some sanding along the tread lip, really gives the impression of old stairs.
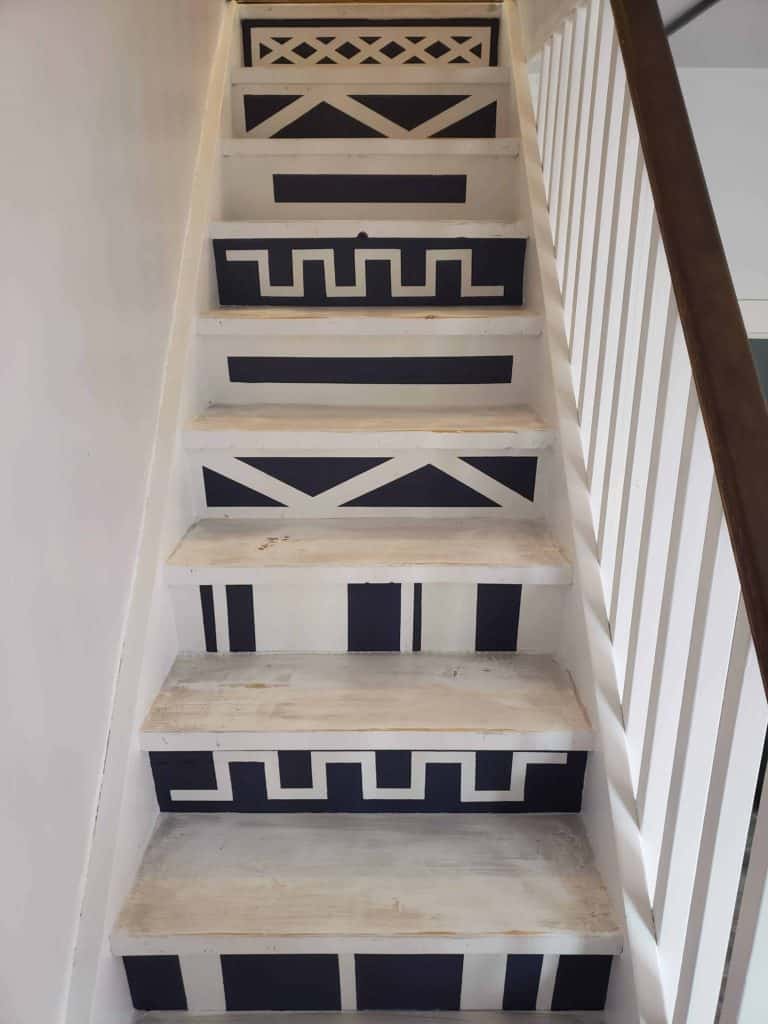
I am quite happy with how this project turned out. It’s also a great example of how if Plan A, or even B doesn’t work, Plan C doesn’t need to be something you settled for. Part of renovating and DIYing is adapting on the fly to what the project gives you. Be sure to let me know what you think of the final results in the comments below. Make sure to follow us on Instagram for sneak peaks of our projects and some behind the scenes of day-to-day life at The Homestud.
Great article, just what I was looking for