
IKEA kitchens: they are popular, easy to assemble and install, but often look boring and incomplete. I want to help change that and hopefully this guide will help you separate your kitchen layout and design stand out from the crowd.
But first a minor tangent- do you remember Hilltop? If not, you can read about about the house and our renovation plan. To cut to the chase, several months ago Hilltop was completed and sold to an excited new homeowner. Now, it’s time to dive in and reveal the finished space.
Instead of just walking through the finished renovation, I want to dig in and discuss the ins and outs of kitchen layouts, with a particular focus on IKEA kitchens. This won’t be a review, but a discussion of kitchen layout and design.
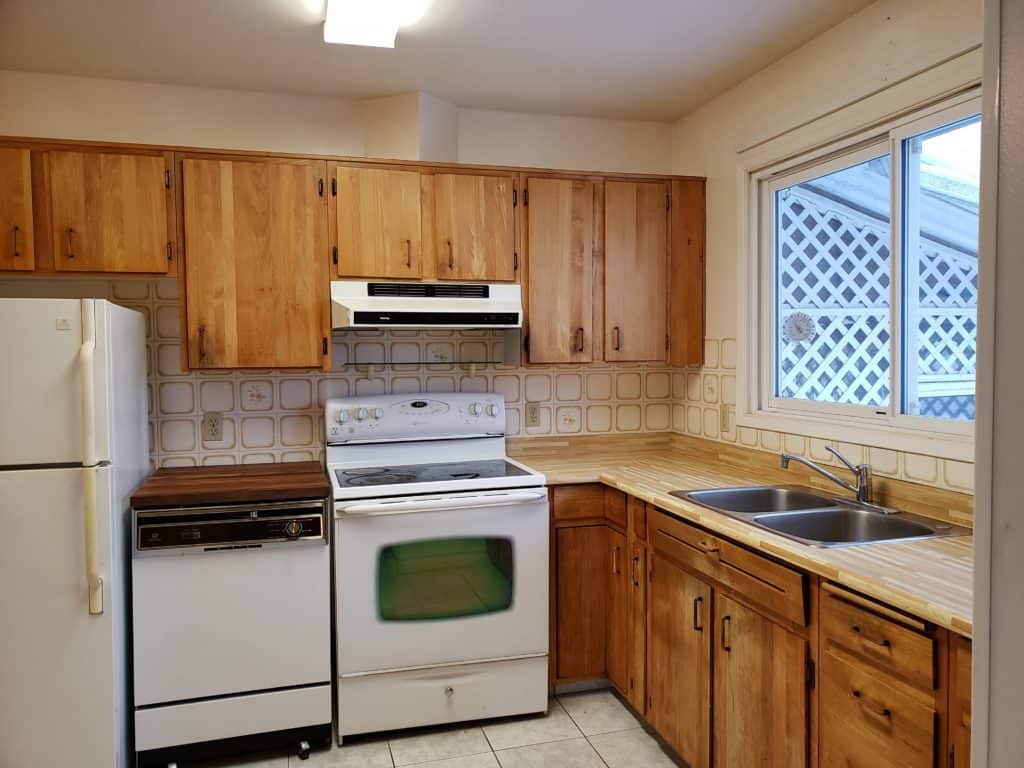
The original kitchen layout at Hilltop
From the very start, the original kitchen was a major reason I loved Hilltop. It was located in a great position, large, and could be incorporated with the rest of the house very easily. In other words, I didn’t need to remove a structural wall. Plus, the solid birch cabinets were beautiful and could be reused in other projects.
The first stage of any major kitchen renovation is demolition. Those who know me or read my posts know that I am not a fan of demo. I would rather be putting a house back together than swinging a sledge hammer. However, at Hilltop, this consisted of carefully removing the cabinetry, with the only real demolition being the tile on the floor and backsplash. The tile came up easy. The real pain was removing the 1000 or so drywall screws holding down the extra plywood subfloor covered with roll vinyl. Using an impact driver saved my butt (and wrist!) during this process.

The renovation plan for Hilltop discusses the smaller details such as aesthetic and finishes. It will also tell you where we sourced many of our materials. I want to keep this post focused on a successful kitchen layout, focusing on using IKEA kitchens, and how we went about the process at Hilltop. Therefore, it makes logical sense to start with the question, “How do you create a successful kitchen layout”?
A successful kitchen layout
I often hear about people just picking cabinets that fit the space, without spending much time thinking about a proper kitchen layout. This is not the way to go! Don’t get me wrong, IKEA kitchens fit this bill perfectly, however, taking the time to think about how the space will be used is crucial to a successful kitchen layout.
Measurements
Time to dig out the tape measure, and measure, measure again, and then measure one more time to be sure. I think you get the importance! I start by taking rough measurements before removing the existing kitchen. This lets the size of the space percolate for a couple of days. Then take the exact measurements once the previous kitchen is torn out. Determine wall lengths, location of electrical sockets (if they are not being relocated), exact location of windows (you will see why this becomes important), and kitchen depth (especially important if you are considering a built-in island or custom movable kitchen island). Now is also a good time to get measurements for any potential peninsula or breakfast bar as well.
Kitchen layout
Once the measurements are complete, it is time to start determining the new kitchen layout. Hopefully, at this point you have a solid idea of how you want/will work in the new space.
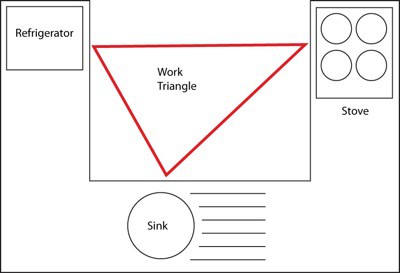
Traditionally, many designers push the ‘working triangle‘ school of thought, and I often keep this in mind as well. It refers to the 3 primary zones of use- the sink, the range, and the fridge. This thinking lends itself more to older homes where the kitchen was often segregated in a separate room or the corner of the house. However, as our building designs change, and open floor plans expand, kitchen layout and design is changing. It is no longer uncommon to find the kitchen located along one wall with a large island across from it, meaning all the working zones are in a line. In the end, a well thought through kitchen layout comes down to efficiency, with each location requiring working space.
I always start with the sink. More often than not this is underneath the kitchen window in North American homes. From there, I can determine the locations of the other primary kitchen zones (range and fridge). At Hilltop, we left the kitchen sink located beneath the large window. We also left the range in roughly the same location- I only needed a few inches for the corner cabinet and I didn’t want to relocate the exhaust ducting or electrical. However, we completely relocated the fridge to the center wall of the house. This was done largely to increase the amount of working space near the range.
If there are any other appliances you plan to incorporate, now is the time to do so. This may include microwaves, dishwashers, or coffee and espresso machines. This is your chance to design a kitchen layout that truly works for you, so take advantage of it. For example, at Hilltop we included a full height microwave cabinet next to the fridge. This doubles as both a pantry space, as well as a way to keep the microwave from taking up valuable counter space.
Organization
The final step, and possibly the most challenging, is filling in the remainder of the cabinetry. Think about where you want to store utensils and cutlery, knives, kitchen gadgets, tea towels, mix-masters, spices, dry goods, plates, bowls, glasses, the list goes on and on. There is an abundance of storage and organization options designed to fit drawers and cabinets perfectly, so space isn’t wasted. This process may seem daunting, but get into the groove and it can actually be quite rewarding. Future you will be thankful when working in the new kitchen layout.
A comprehensive organizational guide
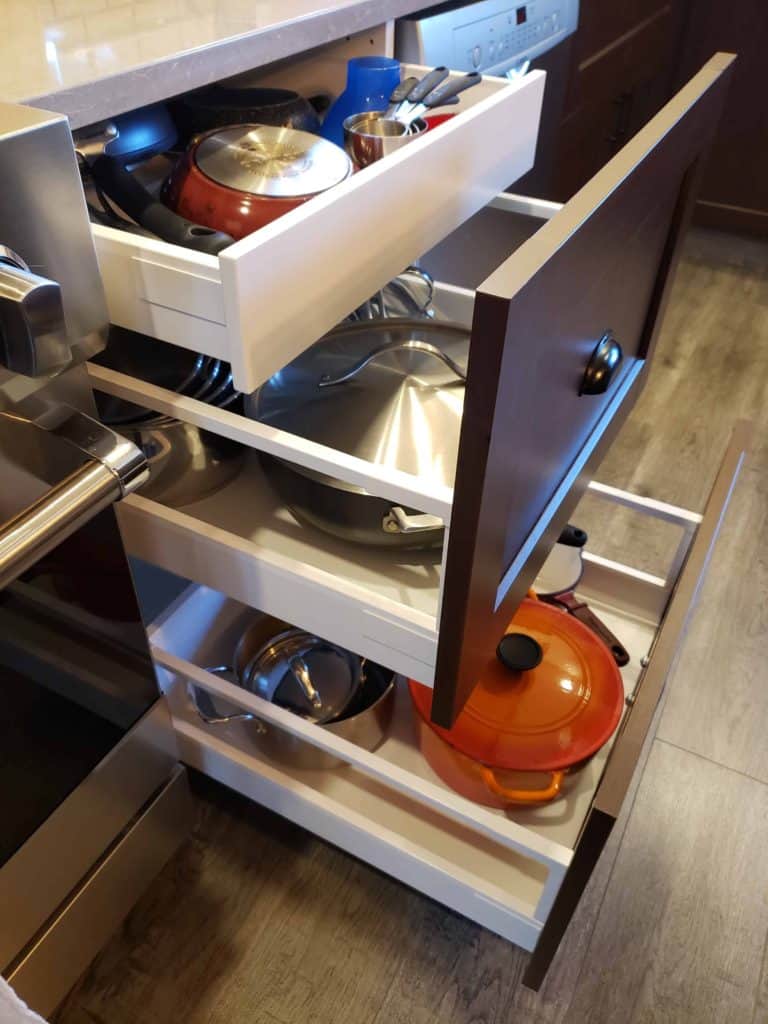
Some examples include, large drawers for pots and pans near the range. A bank of drawers for cutlery and utensils or tea towels near the dining area. Lastly, a larger cupboard space for small appliances such as toasters or slow cookers. A proper kitchen layout will make working in the space far more enjoyable.
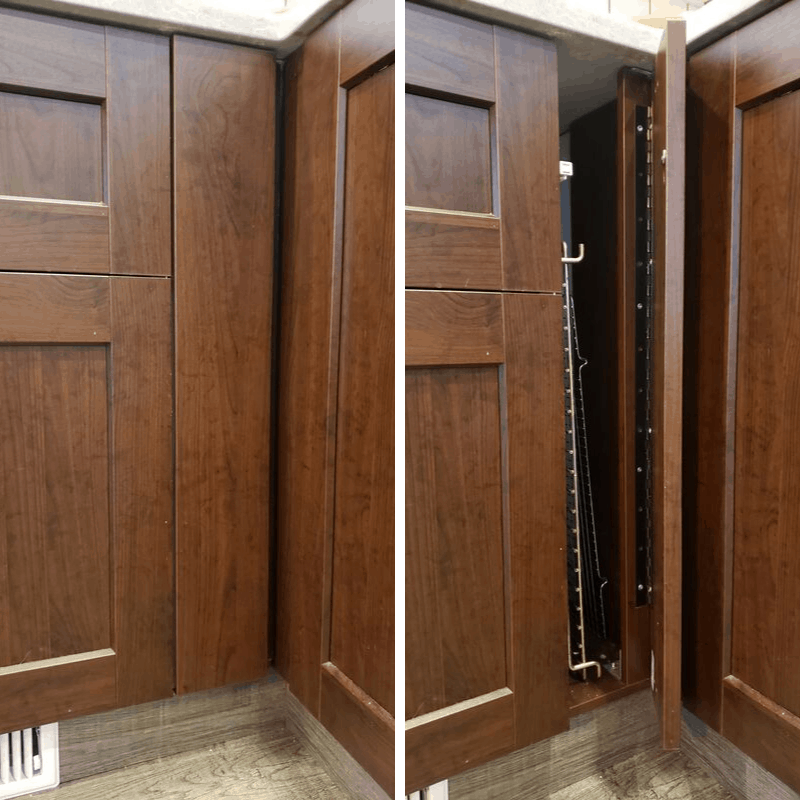
Optimize your design with blind corner cabinets
IKEA’s cabinet options
IKEA kitchens are an ‘off-the-shelf’ system with an incredible amount of customization available.
Base cabinets
Similar to any cabinet maker, IKEA has standard base cabinets. These are 30″ high, 24″ deep, and come in a variety of widths (12″, 15″, 18″, 21″, 24″, 30″, 36″). In addition, there are specific cabinets for sinks, corners, and appliances. The varying widths allow enough customization to fit almost every conceivable kitchen layout. They even have a 3D kitchen planner to help with design. Just be prepared to exercise some patience.
The standard widths mentioned above come with one major drawback. IKEA kitchens rarely fit perfectly into the space without a small gap or space. This needs to be addressed using filler panels, or involves getting creative and making custom cabinets.
For example, in my home I have a custom 5″ hidden cabinet and it is surprisingly easy to replicate. In order to keep my sink centered below my window, I had to leave a gap between the sink cabinet and the corner cabinet. Because I built my own cabinet kicks (see under construction below), I was able to use them as a base for a custom cabinet box with a drawer front turned sideways for a door. I used a standard black piano hinge and a magnetic latch to open and close the door. This is a great way to store baking sheets, extra oven racks, or really anything tall and awkward. In addition, it doesn’t leave wasted space in the design.
IKEA also makes base cabinets that are 15″ deep to accommodate narrow areas, such as a pass-through or butlers pantry (because we all have one of those…).
Choosing base cabinets goes hand-in-hand with the kitchen layout and organization process. Each cabinet can be fitted with doors, or drawers (multiple sizes), or drawers inside drawers! It is best to select each cabinet and configuration with its contents in mind. As I mentioned above I install two large drawers for pots and pans. Typically I will use a cabinet between 24″ and 36″. Inside that cabinet, I will also hide another drawer near the top for measuring cups and small fry pans. This setup is best placed as close to the range as possible, increasing efficiency.
Upper/wall cabinets
These are cabinets designed to be hung on the wall. They come in a standard depth of 15″, and have both varying heights and widths. Once again, there are special wall cabinets, which are designed for corners, above the fridge, wine racks, or open shelving. Nearly every wall cabinet comes with the option of adjustable shelves, as well as the option to insert drawers.
Similar to when selecting base cabinets for your kitchen layout, be sure to think about what will be stored in each wall cabinet. It is also wise to think about symmetry. Earlier I discussed knowing the exact location of kitchen windows. When selecting wall cabinets, maintain an even spacing on each side of the window. This is where that grade school math really comes in handy!
Tall cabinets
In nearly every kitchen layout there should be a space where a tall cabinet is included. IKEA’s tall cabinets come in either 15″ or 24″ depth, and 80″ or 90″ heights depending on the use. Similar to their other cabinetry, tall cabinets come in a variety of widths. As I mentioned above, we used one at Hilltop to store the microwave. In fact, I have never designed an IKEA kitchen layout without using tall cabinetry. In addition to microwave cabinets, they also manufacture tall cabinets to hold wall ovens.
The extras in IKEA kitchens
IKEA kitchens come with even more ability to customize and tailor designs. This is probably the most overlooked park of the entire process. Along with their kitchen cabinets, they sell end gables and deco strips. End gables are purchased to hide the exterior of white cabinet boxes. These can be purchased in various sizes depending on need. Deco strips are typically used to hide under cabinet lighting, however, I install them on every kitchen because of the refined added touch they add to the overall design.
Another product for IKEA kitchens are carts and movable islands. These are an easy, affordable option that only requires assembly. However, I suggest building your own if you really want a kitchen that stands out from the rest of the IKEA kitchens out there. If there is lots of space, build in a custom island with millwork and cabinetry. If there is less space and you want more freedom, consider a movable farmhouse style island with butcher block top.
Cabinetry tips and tricks:
Over the years of working with IKEA kitchens, I have found some useful methods to elevate the design.
- Skip the plastic feet and build kicks (details below)
- Use end gables to hide both the upper and lower cabinet boxes (don’t forget to account for their width in the kitchen layout)
- End gabels should extent right to the floor
- Use deco strips to add a little extra flair and finish
- Always think about symmetry- whether that is on each side of a window, or from upper to lower cabinets
- Drawer fronts turned sideways make for great hidden storage instead of just dead space
- Use fixa brackets when installing stone countertops
If you feel like a little more research is still in order, you can read our IKEA kitchen review, or play around with IKEA’s planning tools to get a feel for kitchen layouts that fit your space. Need some inspiration or ideas? Check out the kitchen layout for Hilltop and The Beige Bungalow.
For those gung-ho and ready to keep moving along, below I walk through the construction process. Just be sure to come back and learn the real secrets to the IKEA kitchen sale.
Construction
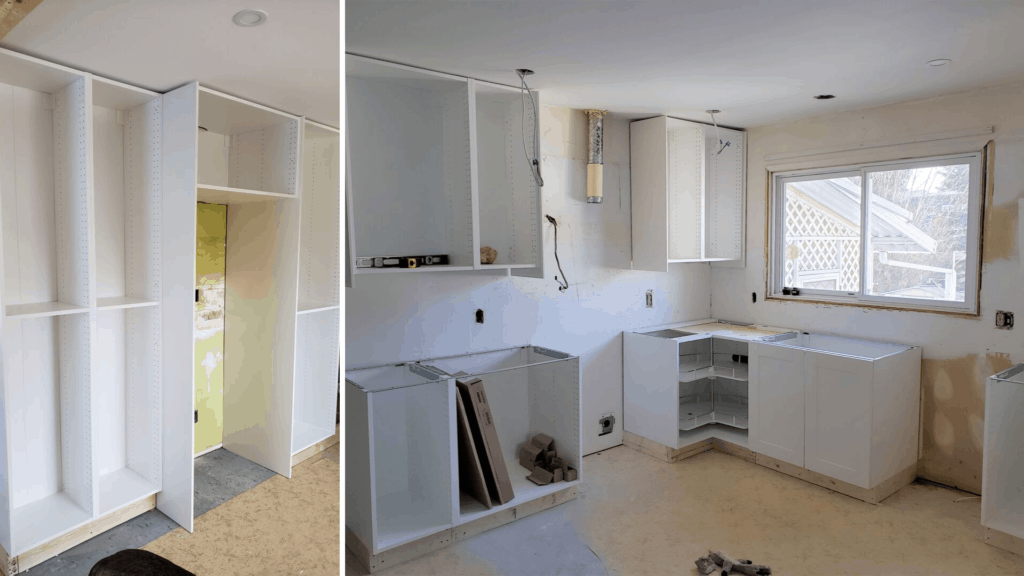
A kitchen from IKEA means I am starting from the ground up with custom kicks for all of the cabinets. I build my kicks out of 2×6″ dimensional lumber and rip them down to the necessary height on a table saw. The example below calculates the height I used at Hilltop.

It is easier to level the kicks versus the cabinetry later on. I will admit that leveling cabinets with their supplied plastic feet is easier, I simply don’t trust those little twist locking feet to hold up long term with hundreds of pounds of stone countertop sitting on them.
Once the kicks were complete and leveled, I moved on to assembling and installing the cabinetry. I’ll admit the next many hours of your life will be repetitive and tedious- assembling the cabinet boxes is rather boring. I assemble and dry fit all of the cabinetry before completing the final installation, which involves screwing the cabinet boxes together. Tip- use small trigger clamps to hold the cabinet boxes tight together. At this point there is no going back without accruing extra costs. I leave the doors and drawer fronts off until much later in the installation process, just to be sure they don’t get dinged up or scratched.
Wall cabinet installation tip:
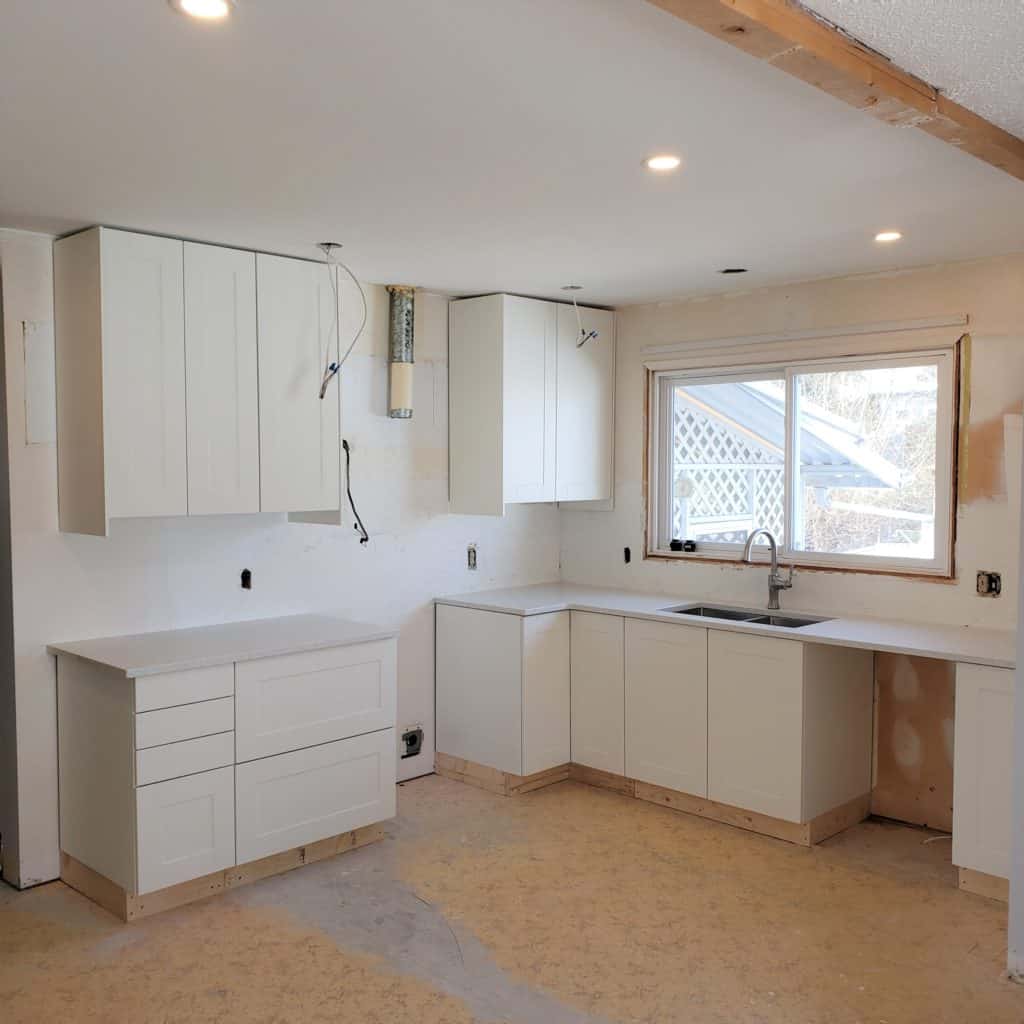
The typical house I work in has a ceiling height of 8 feet. Therefore, I buy 40″ tall wall cabinets and install them as close to the ceiling as possible; a) this elevates the eye making the ceiling feel higher, b) no one wants to have to get up and dust the weird 5-10″ above cabinets, and c) 40″ upper cabinets increase the amount of storage compared to 30″ cabinets.

Once the base cabinets are installed, I am left with an optimal distance between my countertop and upper cabinets, even after adding the deco strip.
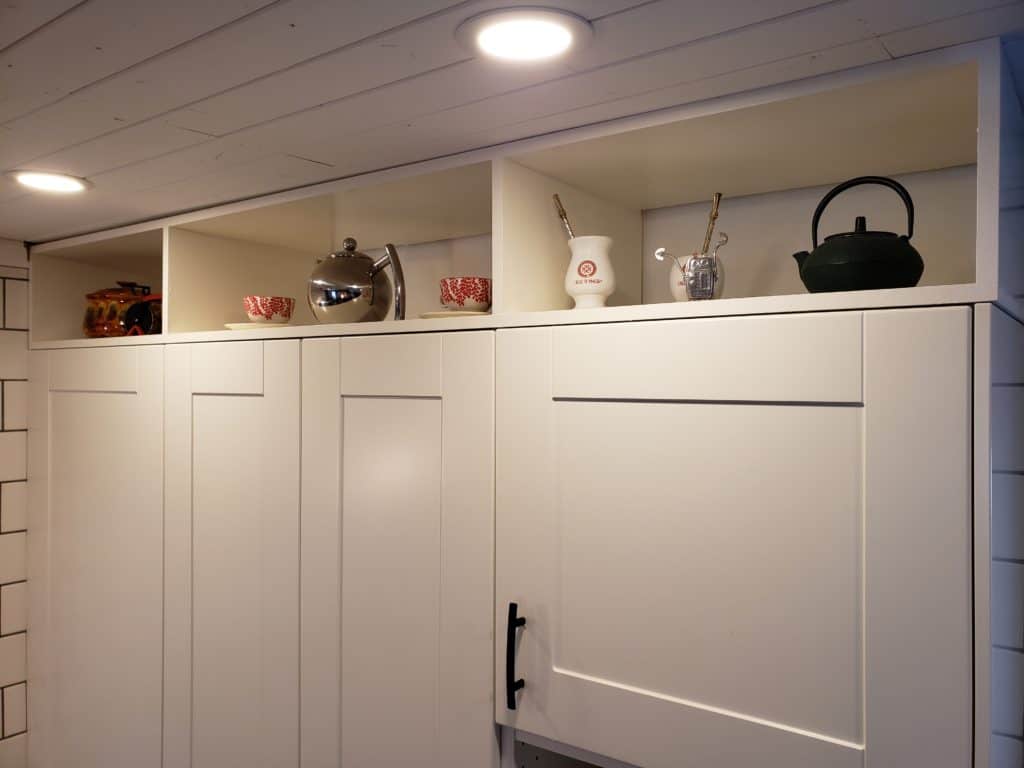
If the house has 9′ ceiling heights, get creative and place custom shelving above. It is easy to build and Home Depot color matching for paint works incredibly well. Before you even ask, yes this does collect dust… However, it gives the appearance of cabinetry right to the ceiling, and it makes the ceilings feel VERY high. Another option in this space would be custom cabinet boxes with 10″ drawer fronts.
Where kitchen layout meets design
Countertops: What do you choose?
Once cabinetry is completed, it is time for one of the best days on site- countertop templating. Countertops are a tricky component of kitchen design because they are one of the first things everyone notices. Watch HGTV and you will hear about Carrara marble and beautiful quartz. Well truth be told, choosing a countertop surface is much more difficult in person. Although beautiful, Carrara marble requires maintenance and even then I have heard that it still shows signs of wear in a kitchen. Quartz (my primary choice) varies drastically in cost and even quality depending on who you talk to.
I approach countertop selection in a very deliberate manner: budget. I need to stay within budget, because at the end of the day I am running a business. That being said, in my personal house, my wife and I were far more willing to pay more for the exact quartz counters we wanted. Shop around! Most installers will purchase the same brand(s) of stone, however the quality of installation can vary drastically.
I should also mention that I have never purchased my quartz countertops from IKEA. This is not to say they are a poor choice (in my city they carry Caesarstone quartz, which is well regarded). However, the end result will all depend on who carries the installation contract in your city. At Hilltop, I went with Bianco Galaxy Quartz. It wasn’t my first choice but it fit within the budget, and ended up giving the kitchen a bit of glitz.
This by no means is a comprehensive list of available options. Some others include laminate, marble, granite, butcher block, bamboo, and even concrete. Do the research to help determine what surface is best for you.
Backsplashes
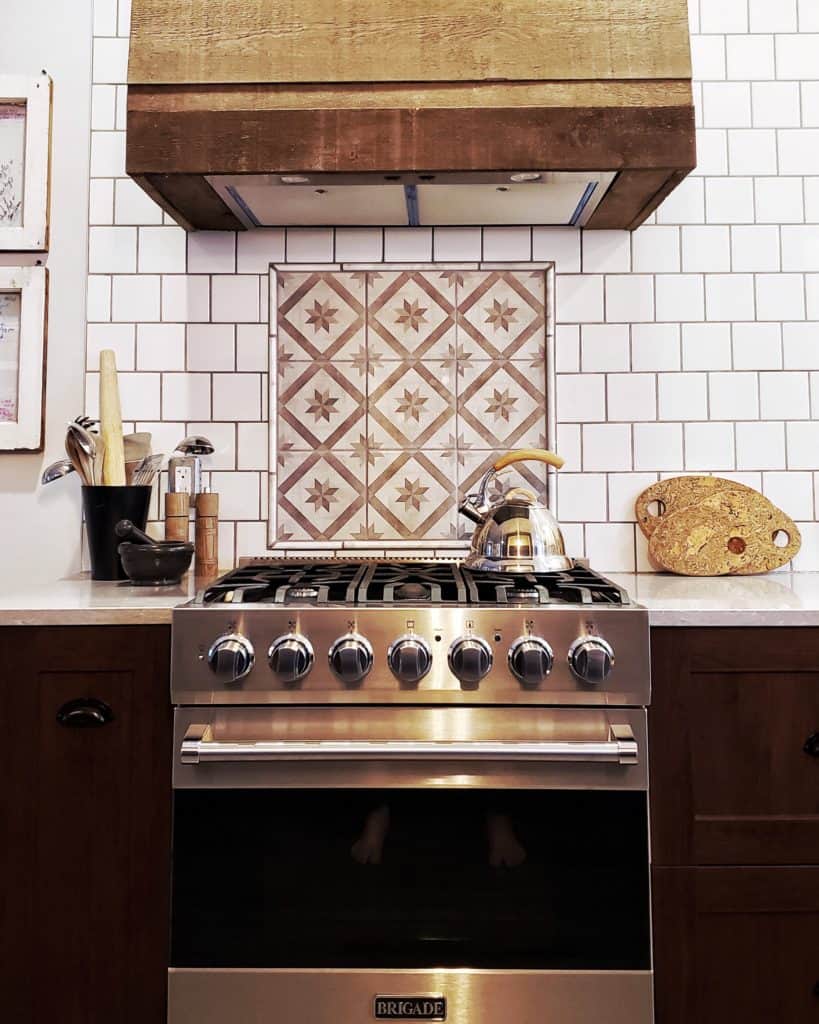
Once the countertops are completed, I can move onto the backsplash. I’ll admit I’m not flashy- I typically go for subway tile of some sort. Or maybe it’s because I’m cheap? I like some of the fancier mosaic tile options, but it’s hard to justify $8 – $30 per square foot in many of my houses. So yes, I guess it’s because I am cheap… My only rule of thumb- heavier patterned countertops get simpler backsplashes; while simple countertops need some pop in the backsplash tile. This can be a mosaic or unique shape (think scallop, picket, or lantern). Backsplashes are a great place to make your kitchen stand out. Some other ideas to add character include running the tile all the way to the ceiling, or adding a design behind the range.
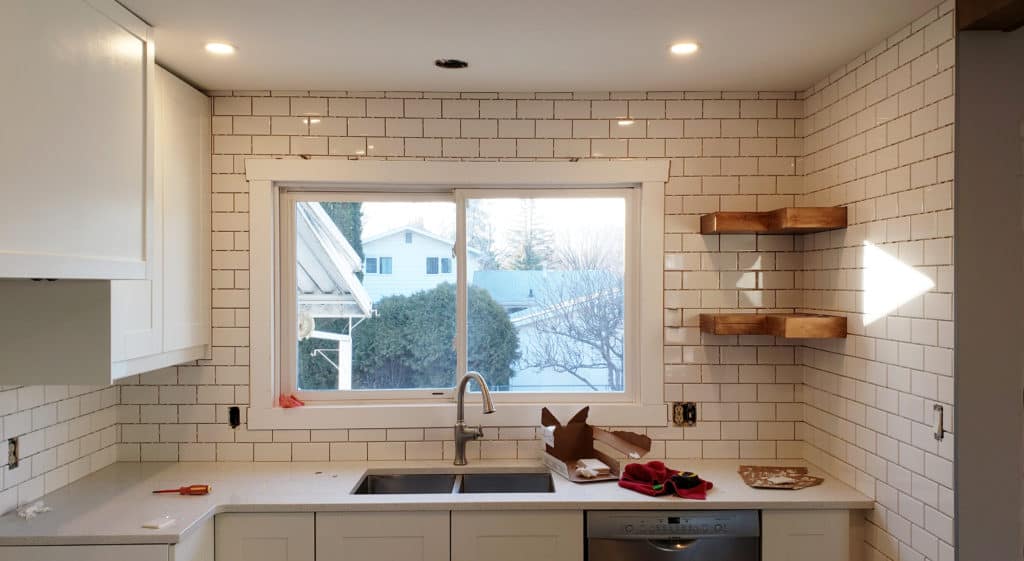
- floating wood shelves on the right of the window add balance and warmth against the wall cabinets to the left
Hardware
What exactly is hardware? Kitchen hardware is any of the handles or knobs used for cabinets and drawers. Don’t overlook how important this is to both design and efficiency. Not only do you want them to look good, but you will be pulling on those handles or knobs hundreds of times a week. They need to be functional.
At Hilltop I continued with the theme of black accents running through the house. I wanted a chunky handle that would really stand out against the white cabinets, and wound up going with matte black straight pulls. These tied in nicely with the black closet doors, lighting, and interior door handles found in the rest of the house. Tip- use a cabinet hardware jig when drilling the holes for the cabinet pulls to keep them even and level.
Interested in a new kitchen layout or design?
What takes IKEA kitchens from good to great?
If you have made it this far, your new kitchen is well on its way to being great. Including features such as deco strips and end gables may seem simple, but many avoid these elements because of time and cost. Elegant countertops and backsplashes add to the overall aesthetic, but even they are becoming more common. So, how does one really make a kitchen layout and design stand out? The answer is custom features.
Creative custom elements
Let’s be honest, out-of-the-box, IKEA kitchens need some help. Crown molding at the top of cabinets can add a nice touch. This provides a clean finish at the top and takes cabinetry to the next level. Just remember, crown molding is an element more suited to traditional design (shaker, flat panel, or raised panel doors), so keep that in mind when it comes to cabinet selection. Tip- If you are installing the crown molding against the ceiling, make sure it is close to level or installation can become a real chore!
My personal favorite method for customizing IKEA kitchens is by adding unique range hoods to the design. I don’t just mean a shiny stainless steel range hood (although that can look great too), I mean a fully custom enclosed range hood. You can see in the photo above, I added a barn wood style hood above the range. At Hilltop, I mimicked the shaker style cabinet doors and created a color matched range hood.
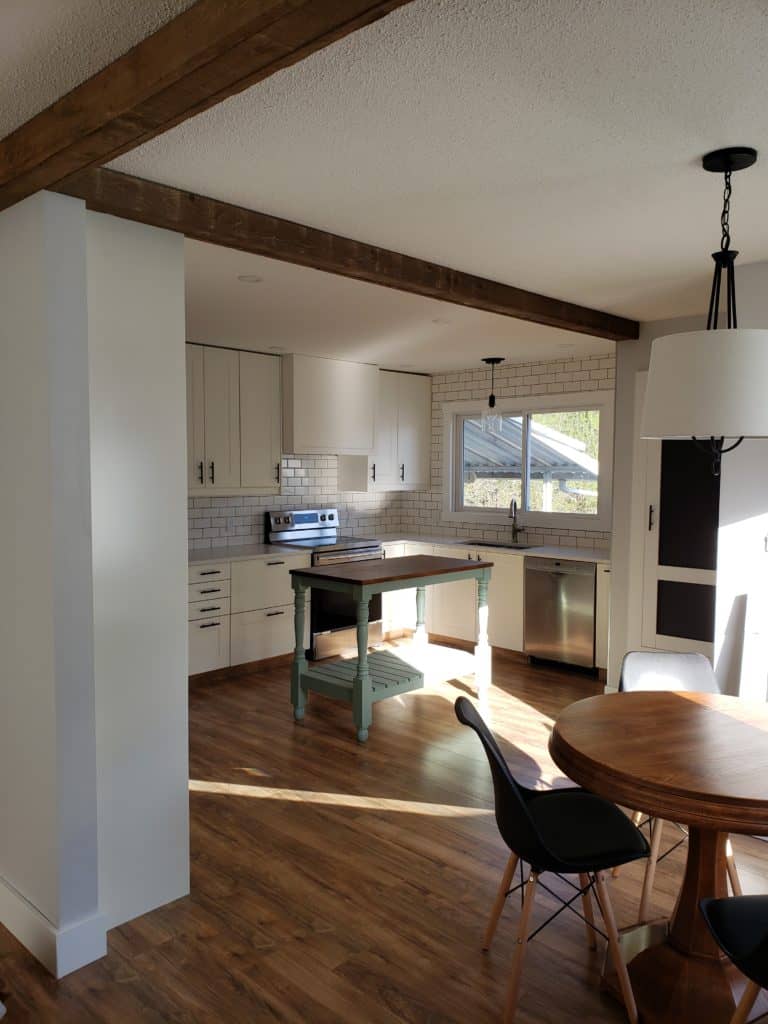
In the first photo above you can see the floating shelves. I find incorporating wood elements helps warm up the space. These floating shelves were part of four custom elements in Hilltop’s kitchen. The three other design elements included a unique farmhouse style island, wood beams on the ceiling, and a solid birch cabinet above the wine racks. Together, they tied into the wood floors to give the whole space a warm and cozy feeling.

- Custom butcher block island provides warm, comfort, and a pop of color to the space
- Shaker style design also found on the black chalk board door of the built-in pantry
- Floating wood shelves help break up the large wall of tile and provide balance by offsetting the cabinetry on the left side of the window
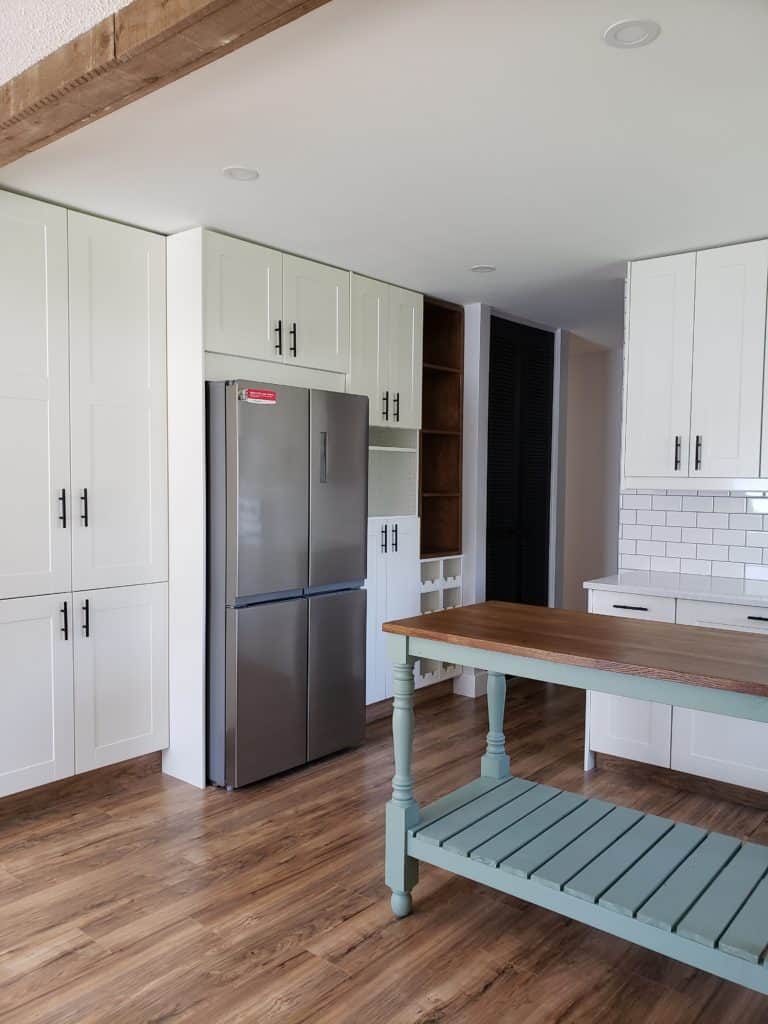
- Counter depth fridge with french doors helps maximize space
- Solid birch shelving unit adds to the other wood elements of the kitchen
- A successful kitchen layout includes ample amounts of storage
- Black elements throughout the design add richness and continuity
- Custom range hood blends in with the space while still looking unique
- Wood beams help separate the rooms without closing in the space
Hopefully this article inspires you to get out and create something beautiful. At the very least maybe you learned a thing or two. As always, I love to read your comments and thoughts below!
This post was a huge help! We are in the middle of designing our kitchen and feel a little lost..
Hi Joan – I’m glad you found it helpful and I understand the feeling, designing can be frustrating! If you would like hand with the design process, please feel free to contact us. Our complete design service will not be released until early 2020, but we have a few spots still open for test clients beforehand.
Hi Jeff, I have been thinking of doing a kitchen remodel using IKEA cabinets for a long time but have always been a little intimidated as I am only a novice DIY. Coming across your blog is making me feel it would be possible to achieve. I think I’d like to use your planning service for although I’m keeping the kitchen layout as is, I’d feel like I’ll need to have someone holding my hand throughout the planning and installation process. I’m thinking I may begin this process later this summer or fall. Thanks so much for the inspiration!
Hi Joan! We would love to help you out in any way we can. If the layout is staying the same, the process is not nearly as difficult as people think. Working slowly and methodically with some patience helps a ton!
Joan, we hired Jeff for our design process and its been great. Jeff is very attentive to every requirement, answering questions in great detail and he provides solid feedback where needed. We’re still tweaking the design a bit, but you won’t be disappointed. We’re very satisfied.
Hi Jeff,
I am so glad I wandered onto your site, very helpful when deciding elements we want in our kitchen. I’m impressed with the work you’ve done with these cabinets.
I’ve got a couple questions, you rave about the quality and durability of these Ikea cabinets, and it all sounds good to me. But how long have you owned them for? I’m trying to get an idea of the lifespan of these cabinets, Can you take a guess? Have you seen anything to make you think they won’t last 15+ years?
Second question, in our kitchen we have stair bulkhead leading to the basement which intrudes into our kitchen space (about the depth of a cabinet) the cabinets we have now hide it inside a cabinet and I’d like to do the same. Do you think if I were to buy a stock Ikea cabinet, I could modify the inside of it without losing structural integrity? We likely won’t be going the stone counter top route so it wouldn’t have to be built to hold an unreasonable amount of weight.
See ‘Website’ I’ve linked for an example of the problem…
Thanks for the advice, and the help!
Thanks for the kind words!
I will be honest in that I have only had IKEA cabinets in my home for just under 5 years. However, I have 3 kids, a big dog, and they still look like the day they were installed (these are in our basement bar). We have had their cabinets in our kitchen for the last few years and again, still look brand new. That being said, I have clients and friends who have had their kitchens for 10+ years and are still happy. So from my standpoint, I have seen nothing that makes me think they won’t hold up over time, especially if you take care of them like any piece of furniture.
Your second question is a tricky problem (we see this in homes here as well). Personally, I wouldn’t try and modify an existing cabinet. I am not sure how adept you are in woodworking skills, but I would build a new cabinet box to suit the angle/stairs. You can still make the space usable and functional by hiding your cabinet box behind a filler panel/door. This combined with a piano hinge and magnetic latch make for a somewhat hidden storage space. Check out this link to get a rough idea of what I mean: https://www.thehomestud.com/hidden-ikea-storage-cabinet/
Although it’s not over stairs, the same process would apply. Finally use some color matching paint to paint your cabinet and you will hardly be able to tell.
Hopefully this points you in the right direction. Good luck!